Blog

  • Cisco ATA 186 Setting Static VLAN – Tool to Calculate VLAN Value

    If you are going to setup an ATA in a network that is non Cisco(sans voice vlan on switches), then you will need to manually configure your ATA to support the Voice VLAN. The easiest way is to let you ATA pull DHCP and configure it via the web interface:

    http://192.168.1.100/dev

    If you want to set an alternate VLAN for the voice traffic on the ATA, you need to change the OpFlag value to 0×00000052.

    You then have to set the VLAN field to hex representation of what VLAN you want, though the method you have to go about it is somewhat convoluted…or well, really convoluted hehe. I’m not going to explain the complicated process, because someone has already gone through the trouble, here.

    What I did, was to write an Autoit script that will do all the work for you! All you have to do is type in the VLAN ID you want to convert and click a button. The prog will display the crazy hex number and also copy it to the clipboard.
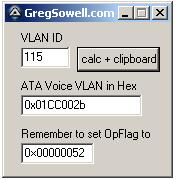
    ATA Voice VLAN Prog...oh so pretty.
    ATA Voice VLAN Prog…oh so pretty.

    You can download the compiled program

    , or use the code below:

    #include <EditConstants.au3>
    #include <GUIConstantsEx.au3>
    #include <StaticConstants.au3>
    #include <WindowsConstants.au3>
    
    #Region ### START Koda GUI section ### Form=C:\Documents and Settings\gsowell\Desktop\autoit\ata voice vlan\ata voice vlan.kxf
    $Form1_1 = GUICreate("GregSowell.com", 165, 152, 193, 115)
    $Input1 = GUICtrlCreateInput("", 16, 24, 49, 21)
    $Label1 = GUICtrlCreateLabel("VLAN ID", 16, 8, 46, 17)
    $Label2 = GUICtrlCreateLabel("ATA Voice VLAN in Hex", 16, 56, 119, 17)
    $Input2 = GUICtrlCreateInput("", 16, 72, 121, 21)
    $Button1 = GUICtrlCreateButton("calc + clipboard", 72, 24, 83, 25, 0)
    $Label3 = GUICtrlCreateLabel("Remember to set OpFlag to", 16, 104, 133, 17)
    $Input3 = GUICtrlCreateInput("0×00000052", 16, 120, 73, 21)
    GUISetState(@SW_SHOW)
    #EndRegion ### END Koda GUI section ###
    
    While 1
    	$nMsg = GUIGetMsg()
    	Switch $nMsg
    		Case $GUI_EVENT_CLOSE
    			Exit
    		case $Button1
    			_rockIt()
    	EndSwitch
    	sleep(20)
    WEnd
    
    Func _rockIt()
    	$converted = ""
    	GUICtrlSetData($Input2,$converted)
    	if GUICtrlRead($Input1) <> "" Then
    		;calc it and producte the hex
    		;0000 0000 0000 0000 0000 0000 0010 1011
    		;00 [00 0000 0000 00] 00 0000 0000 0010 1011
    
    		$converted = _DecToBinary(GUICtrlRead($Input1))
    		if StringLen($converted) == 4 Then
    			;need to append 8 zeros first
    			$converted = "00000000" & $converted
    		Elseif StringLen($converted) == 8 Then
    			;need to append 4
    			$converted = "0000" & $converted
    		EndIf
    		;append the proper amount of zeroes
    		$converted = "00" & $converted & "00"
    		;ToolTip($converted,0,0)
    		$converted = "0x" & _BinaryToHexString(StringLeft($converted, 4)) & _BinaryToHexString(StringMid($converted, 5,4)) & _BinaryToHexString(StringMid($converted, 9,4)) & _BinaryToHexString(StringRight($converted, 4)) & "002b"
    		GUICtrlSetData($Input2,$converted)
    		ClipPut($converted)
    		
    	EndIf
    EndFunc
    
    ; Decimal To Binary
    Func _DecToBinary($iDec)
    Local $i, $sBinChar = ""
    
    If StringRegExp($iDec,'[[:digit:]]') then
    $i = 1
    
    Do
     $x = 16^$i
     $i +=1 
     ; Determine the Octets
    Until $iDec < $x
     
    For $n = 4*($i-1) To 1 Step -1
        If BitAND(2 ^ ($n-1), $iDec) Then
            $sBinChar &= "1"
        Else
            $sBinChar &= "0"
        EndIf
    Next
     Return $sBinChar
    Else
        MsgBox(0,"Error","Wrong input, try again ...")
        Return
    EndIf   
    EndFunc
    
    
    ; Binary To Hex
    Func _BinaryToHexString($BinaryValue)
        Local $test, $Result = '',$numbytes,$nb
    
    If StringRegExp($BinaryValue,'[0-1]') then
        
        if $BinaryValue = '' Then
            SetError(-2)
            Return
        endif
    
        Local $bits = "0000|0001|0010|0011|0100|0101|0110|0111|1000|1001|1010|1011|1100|1101|1110|1111"
        $bits = stringsplit($bits,'|')
        #region check string is binary
    
        $test = stringreplace($BinaryValue,'1','')
        $test = stringreplace($test,'0','')
        if $test <> '' Then
            SetError(-1);non binary character detected
            Return
        endif
        #endregion check string is binary
    
        #region make binary string an integral multiple of 4 characters
        While 1
            $nb = Mod(StringLen($BinaryValue),4)
            if $nb = 0 then exitloop
            $BinaryValue = '0' & $BinaryValue
        WEnd
        #endregion make binary string an integral multiple of 4 characters
    
        $numbytes = Int(StringLen($BinaryValue)/4);the number of bytes
    
        Dim $bytes[$numbytes],$Deci[$numbytes]
        For $j = 0 to $numbytes - 1;for each byte
        ;extract the next byte
            $bytes[$j] = StringMid($BinaryValue,1+4*$j,4)
    
        ;find what the dec value of the byte is
            for $k = 0 to 15;for all the 16 possible hex values
                if $bytes[$j] = $bits[$k+1] Then
                    $Deci[$j] = $k
                    ExitLoop
                EndIf
            next
        Next
        
    ;now we have the decimal value for each byte, so stitch the string together again
        $Result = ''
        for $l = 0 to $numbytes - 1
            $Result &= Hex($Deci[$l],1)
        Next
        return $Result
    Else
        MsgBox(0,"Error","Wrong input, try again ...")
        Return
    EndIf   
    EndFunc

    If you need to reset your ATA to default, plug in a handset and hit the button on top. Then type in 322873738#. To check ATA IP, type in 80#. This and more can be found in the ATA Basic Config Guide.

  • Mikrotik Newsletter 17

    Here’s the PDF.

    Lets see what we have here…

    They announced the RB433UAH. This is the 433 with some additions:

    • Two USB 2.0 ports – this can be for external storage. At the last MUM they had an 433 UAH running with an external HD taped to it. Uses, uses…external cach for web traffic, 3G modems and “other” devices. I can only guess what drivers they will include for “other” devices…like fighting plaque.

      usb toothbrush
      usb toothbrush

    New WoL (Wake on LAN) tool…though I have to admit, I’ve never needed to use a WoL tool.

    /tool wol FF:FF:FF:FF:FF:FF

    They talk about the RB450G again, calling it “the most affordable MPLS router in the market.” I have to say that I think they are chasing the wrong market with MPLS. I’ve only seen the necessity for MPLS in larger provider infrastructure. On a side note, I have a 450G in my posession and I have started doing some BGP testing with it. I’m also going to do some BGP testing in METArouter. I’ve got an article in the works for this one, so stay tuned 😉

    They also have a method to log to file now. This seems like it would be pretty good for debugging and the like. Perhaps you can use this to pipe some command output to a file, we shall see.

    To log everything to file, add new log action:

    /system logging action add name=file target=disk disk-file-name=log

    then make everything log using this new action:

    /system logging action=file

    you can log only errors there by issuing command:

    /system logging topics=error action=file

    If you have accessable usb
    flash as usb1 directory under /files, you should issue
    following command:

    /system logging action add name=usb target=disk disk-file-name=usb1/log
  • Zimbra View LDAP

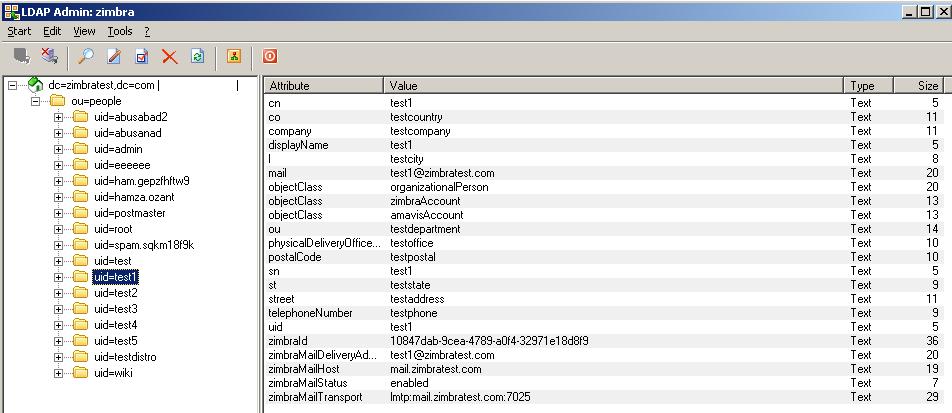
    I use LDAPAdmin whenever I’m going to be doing some backend work. I wanted to get the structure of the user accounts on a Zimbra server, so I did the following:

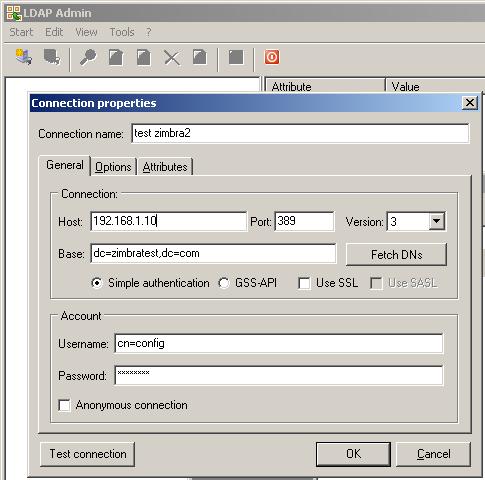
    First, allow connections to TCP 389 to your Zimbra box from your PC or admin subnet.

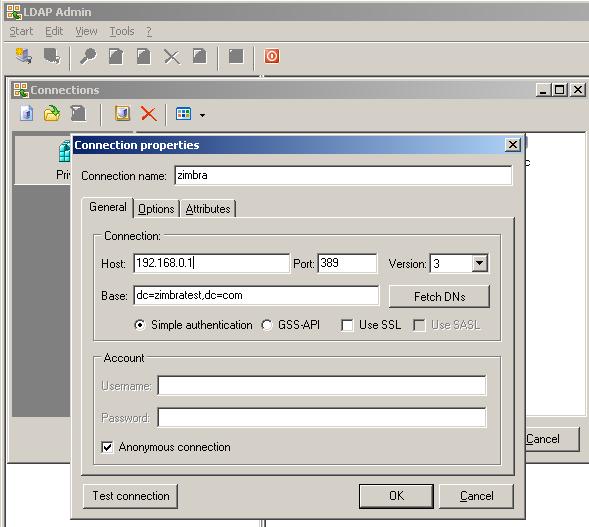
    Connection setup, replace zimbratest with your domain:

    LDAPAdmin connection settings
    LDAPAdmin connection settings

    Next, get your browse on:

    Browsing LDAPAdmin
    Browsing LDAPAdmin

    If you want to connect as the admin user, do the following:

    At the command line, su as user zimbra and then type

    zmlocalconfig -s ldap_root_password

    Then use user config:

    user admin ldap zimbra
    user admin ldap zimbra

  • What is Zimbra

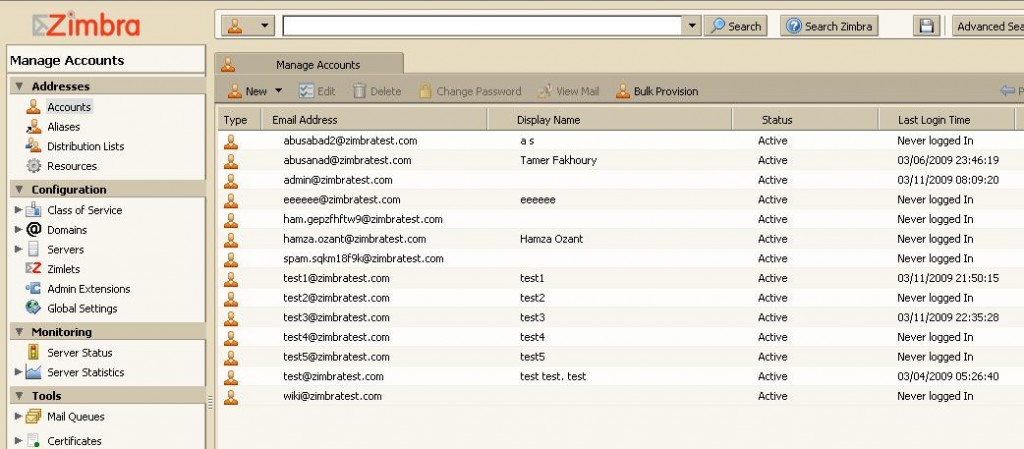
    Zimbra is a cool closed and opensource email system. I’ve only used the opensource version, but I assume the closed version is twice as nice, but I refuse to pay the price. Bad rhyming aside, the closed version offers you an outlook syncing plugin and live backup options. The opensource version runs postfix/spamassasin/clam, right out of the box. I run it on Centos and install via an RPM, so it is quick and easy to get going. This was produced by Yahoo, so you know the user/admin interface will be flash and friendly. Did I mention that the server package is cross platform capable?

    Admin Interface:

    Zimbra Admin
    Zimbra Admin

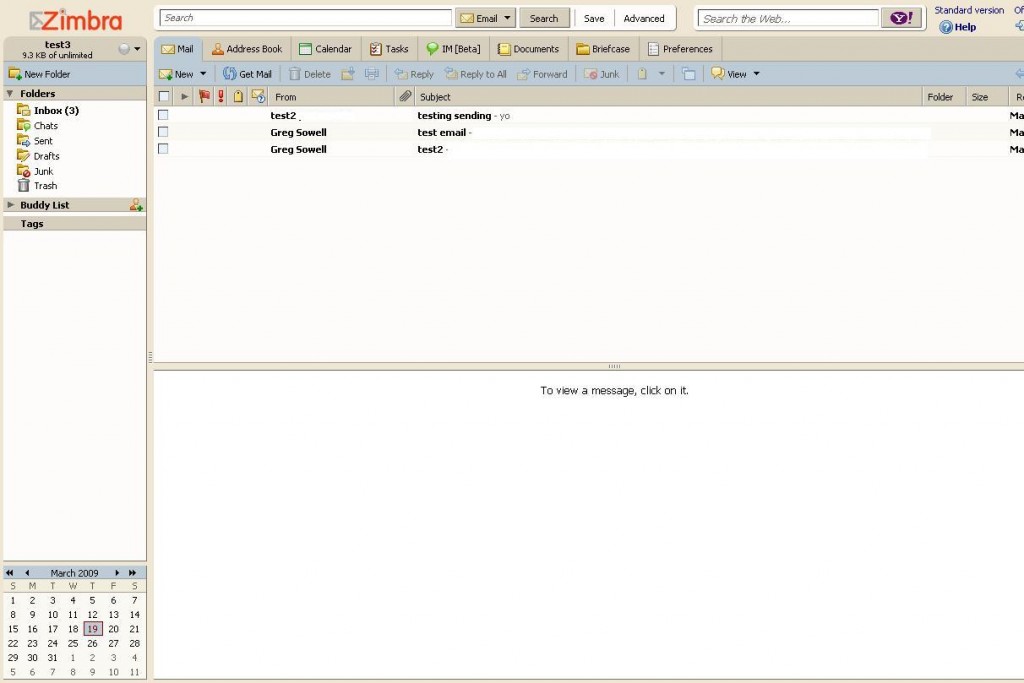
    Zimbra User:

    Zimbra User
    Zimbra User

    As you can see, the user interface is sick! It is basically outlook in a browser.

    They also have the desktop client, which is a java app that is virtually an outlook replacement.

  • *Fix* for Mikrotik Routerboard Heat Issue

    I say *fix*, because it does kind of cripple your RB. While doing some digging last night I saw where some people were complaining of heat issues with RBs in outdoor enclosures. Their RBs would get extremely hot under high load and reboot. To repair the problem, you can underclock the CPU on your RB. I had no idea you could do such a thing, but here is the command.

    Set frequency to something less than max.

    /system routerboard settings change-frequency frequency=266
  • ASA Crypto Map Ordering

    A friend of mine was telling me about an ASA issue he was having. His LAN-to-LAN tunnels would establish and cause intermittent connectivity issues. He would be able to only get to some subnets on either side of the tunnel. It wasn’t always the same subnets, nor would it always happen. His ACLs were the same on either side, as well as his crypto map sequencing.

    Below is similar to what his maps looked like:

    crypto map global_map 10 match address outside_1_cryptomap_1
    crypto map global_map 10 set pfs
    crypto map global_map 10 set peer 1.1.1.1
    crypto map global_map 10 set transform-set ESP-AES-128-SHA
    crypto map global_map 10 set security-association lifetime seconds 28800
    crypto map global_map 10 set security-association lifetime kilobytes 4608000
    crypto map global_map 15 ipsec-isakmp dynamic global_dyn_map !!!!here is our dynamic!!!!!!!
    crypto map global_map 20 match address outside_2_cryptomap_2
    crypto map global_map 20 set pfs
    crypto map global_map 20 set peer 2.2.2.2
    crypto map global_map 20 set transform-set ESP-3DES-SHA
    crypto map global_map 20 set security-association lifetime seconds 28800
    crypto map global_map 20 set security-association lifetime kilobytes 4608000

    The issue was that he had his dynamic mapping in the middle of his crypto sequence. Once he moved it to the end, all was well:

    crypto map global_map 10 match address outside_1_cryptomap_1
    crypto map global_map 10 set pfs
    crypto map global_map 10 set peer 1.1.1.1
    crypto map global_map 10 set transform-set ESP-AES-128-SHA
    crypto map global_map 10 set security-association lifetime seconds 28800
    crypto map global_map 10 set security-association lifetime kilobytes 4608000
    crypto map global_map 20 match address outside_2_cryptomap_2
    crypto map global_map 20 set pfs
    crypto map global_map 20 set peer 2.2.2.2
    crypto map global_map 20 set transform-set ESP-3DES-SHA
    crypto map global_map 20 set security-association lifetime seconds 28800
    crypto map global_map 20 set security-association lifetime kilobytes 4608000
    crypto map global_map 65535 ipsec-isakmp dynamic global_dyn_map !!!!our dynamic at the end!!!

    Every example I’ve ever seen had these dynamics at the end, but I didn’t think it would affect your L2Ls this way.

    Thanks for the tip Brian!

  • Use Asterisk as an SRST (Survivable Remote Site Telephony) Gateway with Cisco CallManager

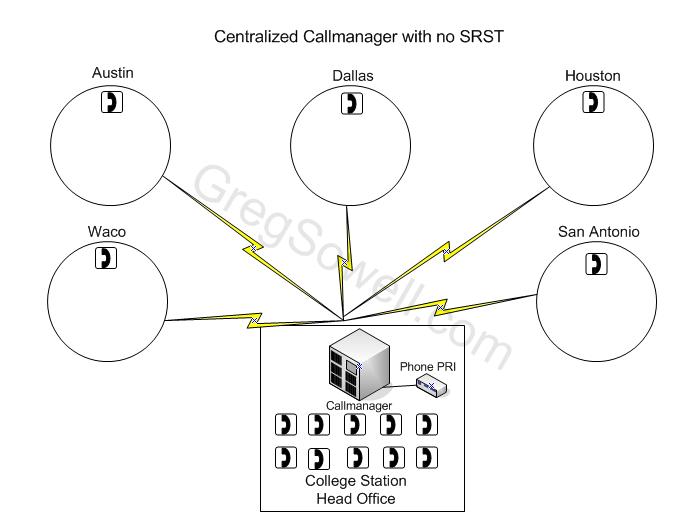
    What is this and why do I need it? Here’s the scenario. You have a central office with five remote offices. You run Cisco CallManager at the central office and you simply deploy phones out at the remotes to use the central Callmanager. This saves you money by using a single call server. Now imagine the link that connects your Dallas office back to the central site, fails. No one in your Dallas office can receive or place calls! Now, imagine that the link from the central office connecting you to all of your remotes fails, and then none of the five remote sites can make calls! This could be devastating. What does one do?

    Central Callmanager no SRST
    Central Callmanager no SRST

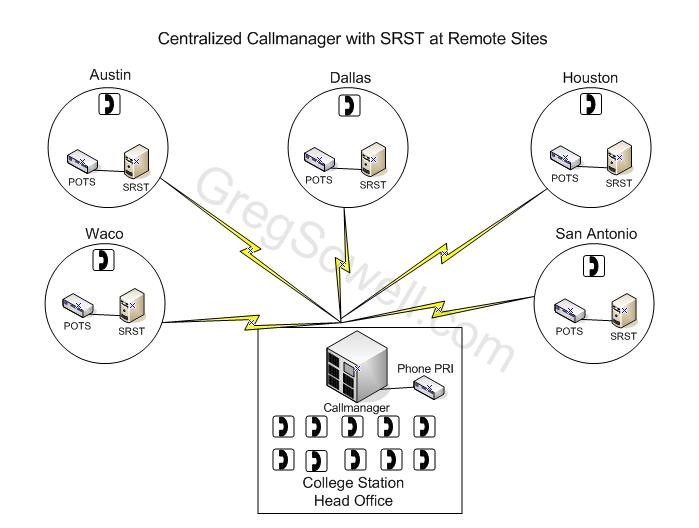
    You install some SRST (survivable remote site telephony). This is basically a fall-back phone system for your remote sites. Going back to the Dallas office, if the link fails with an SRST gateway present, your phones simply register with the local gateway and continue to function. They will often have limited functionality at this point, but you can still make and receive calls!

    Central Callmanager with SRST
    Central Callmanager with SRST

    Now, imagine you have 64 phones at each remote site. Cisco will tell you that you require Unified Communications Manager Express running on a 2851 ($~5K) and a VWIC (voice WIC ~$300) for each site. This at five locations will be somewhere around ~$27K. Now imagine you could get the same functionality for easily less than $1K per site! Seems like a no brainer, right? What if I also said, you could have it automatically update the SRST site with the phones that belong at the site. How you may ask…if you are asking, you should have read the title of the article a little closer…use Asterisk!

    A few easy steps and some scripts I’ve written will do all the hard work for you.

    Click the link below for the full article!
    (more…)