
Blog

  • Cacti Video Tutorial Netflow / Flowviewer

    I wasn’t initially clear enough, so here is meat and potatoes explanation of netflow, then it will get into the history:

    Imagine a user in your network is downloading a huge file from somewhere on the internet. Now imagine you are exporting netflow information from your internet router and collecting it on your cacti box. You will be able to run a query and see that Bob is using a lot of bandwidth. You then run a query looking for just Bob’s traffic. You will see that Bob was pulling X amount of data from a specific server whose IP address is X.X.X.X. You will be able to tell that Bob was using FTP to pull the files because the source port from X.X.X.X was port 20.

    Where did netflow come from? Back in the long long ago, in the before time, Cisco used fast switching. As traffic would enter a router, it would do a lookup in the processor to see which direction to send the traffic. This would create a “flow”. All subsequent traffic associated with this flow would simply be switched through at high speed. “Route once, switch many.” This was eventually depreciated for more efficient techniques, namely CEF.

    Cisco Express Forwarding takes the route table and compiles it into a special set of tables, the adjacency and FIB (forward information base). These tables sit in ASICs (application specific integrated circuits). Since these guys sit in hardware and don’t require the processor to get involved, everything moves faster. Sooooo, getting back to the point of this article 😉

    Netflow is now used to monitor traffic moving through a network. When netflow is enabled on a router, it will export the following information per flow:

    • Source IP
    • Destination IP
    • Source Port
    • Destination Port
    • Amount of Information Sent

    On our Cisco routers, when you enable netflow on an interface, it only takes effect in an incoming direction. What this means is that you really need to enable it on any interface that passes traffic. You then configure the router to export this information to your collector; in this case, our cacti box.

    To see configurations click the link below for full article!!!
    (more…)
  • Large Scale Database Distribution

    I was running the other day when my brain stumbled in an interesting direction. I was thinking about how the government houses vast amounts of information about us. Each person has to have several thousands of lines of information in databases somewhere. I was thinking how one could efficiently query this information in a manageable amount of time. You could have a huge set of storage with a monster front end system, or perhaps there would be an alternative. I then thought of how DNS works.

    If you are looking for a .com, you hit the root servers, and work your way down to the relevant server that holds the information. If you are looking for a .org, you head in a different direction. Why not use this same system for massive databases?

    You could store the person’s name in the “root” database server. If you need tax information, you are directed to the “.tax” server. If you need their arrest record, you head to the “.cops” server. I know you could just write nested queries or the like, but what if the back-end DB system was designed and built to do all of this for you? You wouldn’t have thousands of programmers cranking away for hours every time they wanted to develop a system like this, it would already work like this, and you could just query the system. I suppose you could just create views that did all of the joins and such for you…eh.

    I figure there is something already like this, or perhaps my logic is flawed…I didn’t put too much thought into it, it just seemed like an interesting concept.

    What does the peanut gallery have to say about it?

  • My Cacti Syslog Alerts – Cisco/ASA/Mikrotik/Centos

    Here are a few of my Cacti alerts. I’m definitely a network guy, so you will mostly see network related alerts. If you have any you want to share with the world, add them to the comments!

    !!Start with a few Mikrotik alerts: sys error, accepted a DHCP address and failed login
    NAME				TYPE			 TEXT
    Mikrotik System error		Message Begins with  	 system,error,critical
    Mikrotik Rogue - DHCP Client	Message Contains  	 dhcp,info,debug dhcp-client%got ip address
    Mikrotik incorrect login	Message Contains  	 system,error,critical login failure for user %from %
    !!A lot of Cisco alerts.  Some of these, such as the POS interface may or may not apply to you :)
    Cisco BGP adjchange		Message Contains  	 BGP-
    Cisco dup address		Message Contains  	 Duplicate address 
    Cisco Serial Interface		Message Contains  	 Interface Serial
    Cisco POS interfaces		Message Contains  	 LINEPROTO-5-UPDOWN: Line protocol on Interface POS
    Cisco hsrp			Message Contains  	 HSRP-
    Cisco OSPF Alert		Message Contains  	 OSPF- 
    Cisco MPLS Neighbor Change	Message Contains  	 LDP-
    Cisco MPLS			Message Contains  	 cdt%mpls
    Cisco Duplex Mismatch		Message Contains  	 CDP-%-DUPLEX_MISMATCH
    Cisco err-disable		Message Contains  	 err-disable
    Cisco Spanntree			Message Contains  	 SPANTREE
    Cisco FIB TCAM error		Message Contains  	 fib tcam
    Cisco Power Failure		Message Contains  	 power%supply%fail 
    Cisco Fan			Message Contains  	 BLOWER%fan%fail
    Cisco Voltage			Message Contains  	 ENV%Voltage measured
    Cisco Late Collision		Message Contains  	 \%PM_SCP-SP%late%collision
    Cisco RSP			Message Contains  	 %RSP
    Cisco LACP			Message Contains  	 \%EC%LACP
    Cisco Controller		Message Contains  	 \%CONTROLLER-
    !!User trying to login to your ASA via VPN failed authentication
    ASA failed vpn user		Message Contains  	 %ASA%Remote peer has failed user authentication
    !!Someone logging into your centos box via root
    Centos logon as root		Message Contains  	 Accepted password for root

    I’ve got a tutorial up on adding syslog export to your Cisco devices here.

  • Mikrotik Email Backup Setup

    A buddy of mine, Rob, was kind enough to put up his backup system in the Mikrotik Wiki. This requires that you run your own email system, and have privileges to install a few packages.

    The setup emails your backups to a specific account. Scripts on your server then grab those emails and dump them into their own folder. It’s actually a pretty clever system, and in the end, not too bad to setup.

    I would have to say this is pretty nice work for an Arkansas Redneck ;P~ hehe

  • Mikrotik Changelog 3.23

    Here’s the changelog.

    I’m going to do like always, and pick out my favorites :

    *) fixed installation on fresh disks or VMs;
    This one was a real problem, you couldn’t install 3.22 on a server…which was super fun hehe.

    *) add 802.1ad Service Tag support for VLAN;
    This is an exciting option. This is the open standard version of Cisco’s Q-in-Q tunneling. In essence, you run a metro Ethernet solution around town. You make a VLAN that spans from a customer location on one side of town to the other. The customer can plug a switch into your port and trunk across the link, even though you are only using a single access VLAN! Cisco does this by double tagging. In Cisco, you can also use L2protocol tunneling, which allows you to send CDP, STP, and VTP. Though if you do a QnQ tunnel inside of a QnQ tunnel, you can only use l2protocol tunneling on one of the tunnels, not on both. I learned that the hard way 😉 L2protocol tunneling uses a proprietary MAC, so if you are double tunneling, you can’t have that proprietary MAC show up twice. You will also want to adjust your MTU accordingly, since you are adding a VLAN tag onto a VLAN tag.

    *) added URL support to fetch tool;
    Perhaps we can do nightly config pulls via this method, or one could check if a site is available, and route accordingly.

    *) console – removed support for octal numbers, now string of digits with
    a leading zero is interpreted as decimal number;
    This will be very helpful in scripts…I’m tired of checking for this in date values!..that is…if it works in scripts also.

    There are several more updates in there, so take a peek for yourself.

  • Adding Ringtones to CallManger 4.X

    Occasionally, you just have to make an interesting ring tone. My favorite is to take the popular Youtube video and pull out excerpts, make a ring tone, then sneak it on someone’s phone…:) I’m a classy guy, what can I say?

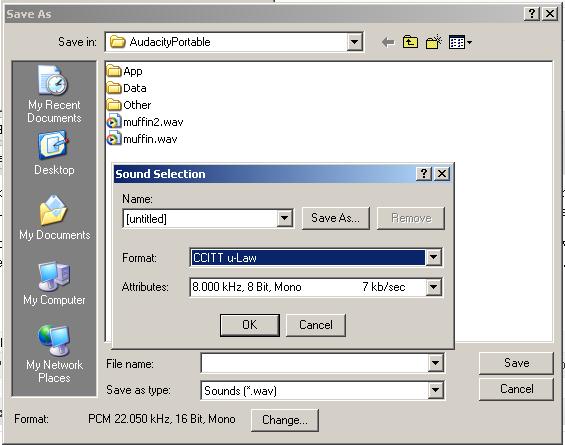
    So, I use Audacity Portable to chop up my file. Once I have it the way I want, I save it as a wav. I then use sound recorder, yes the built-in windows sound recorder, to open, then resave in the proper format. You save it as CCITT u-Law.

    sound-recorder

    Then rename the file to .raw and upload it to your Callmanager in the c:\Program Files\Cisco\TFTPPath folder.

    Edit the Ringlist.xml file and add your new file.

    You will probably need to restart the “Cisco TFTP” service, since the tftp service is set to cach by default.

    Have fun, and I hope you enjoy the muffins Jacob! :P~

  • Add Secondary IP Address to Centos Interface

    This is super simple, just create a new interface file with a colon and a number.

    /etc/sysconfig/network-scripts/ifcfg-eth0:1

    DEVICE=eth0:1
    BOOTPROTO=static
    IPADDR=192.168.0.5
    ONBOOT=yes