

FTTX Hardware
Greenfield install = “Brand new” building. Easier install as you can drop cabling before the walls go up.
Brownfield install = “Existing structure”. Harder/more costly to retrofit.
Some things that may be tricky with condos are that each unit is owned property, so there are legal concerns with running through/around.
No such thing as “cookie cutter” in the MDU market.
Know legal access laws.
Know aesthetic expectations.
New Advancements all the time:
Miniaturization.
New hardware.
New transmission techniques.
GPON = Gigabit Passive Optical Network.
GPON is 2.4Gb down and 1.2Gb up.
GPON is a shared medium – usually around 32 users per port.
Some ONTs can do active or passive. Active is ethernet(you have to insert an SFP), and you will also have symmetric, dedicated speeds per user.
Internet Only Providers
This session was how internet only providers can differentiate themselves.
Student Housing
I’m here at the BCS in Austin. It technically started Monday, but the meat and potatoes starts today and runs through tomorrow. I’m going to try and post some periodic updates about what I see/do.
This summit is mostly about FTTX, what with 3 carriers offering FTTH here in Austin. I’m hoping to walk away with some good direction/vendors for my future optical adventures as well as ideas to apply to my current MDU installs.
My schedule is:


But first…hotel breakfast!
DNS is the resolution protocol for the interwebz. Basically, when your browser does a lookup for a URL it asks your configured DNS server to tell him what IP address the content lives at…but how does your DNS server know where to look for this information?
The Root servers, of course. What are they you ask?
A root name server is a name server for the root zone of the Domain Name System of the Internet. It directly answers requests for records in the root zone and answers other requests by returning a list of the authoritative name servers for the appropriate top-level domain (TLD). The root name servers are a critical part of the Internet infrastructure because they are the first step in translating (resolving) human readable host names into IP addresses that are used in communication between Internet hosts.
At least, that’s what wikipedia says about it.
So how do you know who the Root servers are…via root hints! The root hints file is a small file in your DNS server that stores the root zone server to IP address mapping. This way your server can query by IP address.
A good rule of thumb is to keep your root hints updated every 6 months or so. I started running into intermittent DNS issues and in the process I discovered mine were about 6 years out of date!!!!!!!!
Since I run centos with BIND the easiest thing to do is run this simple command via ssh:
1 | dig +bufsize=1200 +norec NS . @a.root-servers.net > /var/named/named.ca && service named restart |
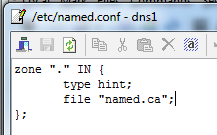
This pulls the root servers, dumps them to the root hint file “named.ca” and then restarts bind. You can verify what the root hint file is by checking your named.conf file in /etc/named.com:
I’m lazy and used webmin to schedule the cron job to run every 6 months:
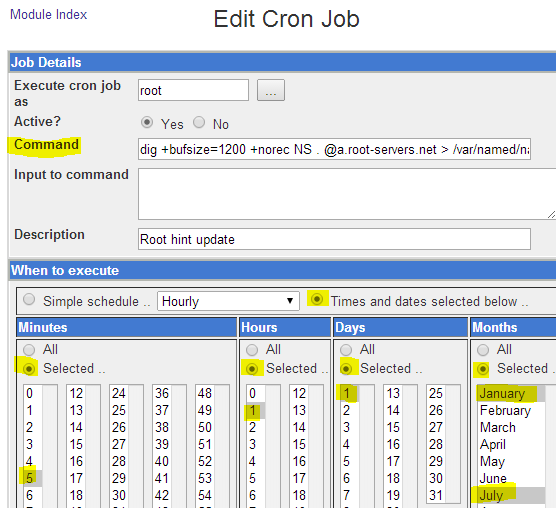
System => Scheduled Cron Jobs => Add New
If this was helpful or you happen to have any similar war stories, drop me a line in the comments section.
So we were killing time in one of my favorite stores, Harbor Freight, when I found out they have their 10″ wheels on sale for $5 each…it was all down hill from there(that pun was for you Andrew).
I did a rough sketch of what I figured it should look like, then went to the big box store to grab some pipe.
We ended up using 1″ PVC pipe, a ton of Ts, elbows, and crosses. I also use two 10″L 5/8″D bolts, one 8″L 5/8″D bolt, and one 1 and 1/4″ cross for the steering shaft. The rest was just a lot of primer and glue.
I kind of played it loose and built and measured as I went. I like making things that are 100% mine, so I didn’t look at anyone else’s methods, though I assume someone else has done this before…?


Steering wheel moves up and down to adjust for the rider.

Push bar

Like a boossssss
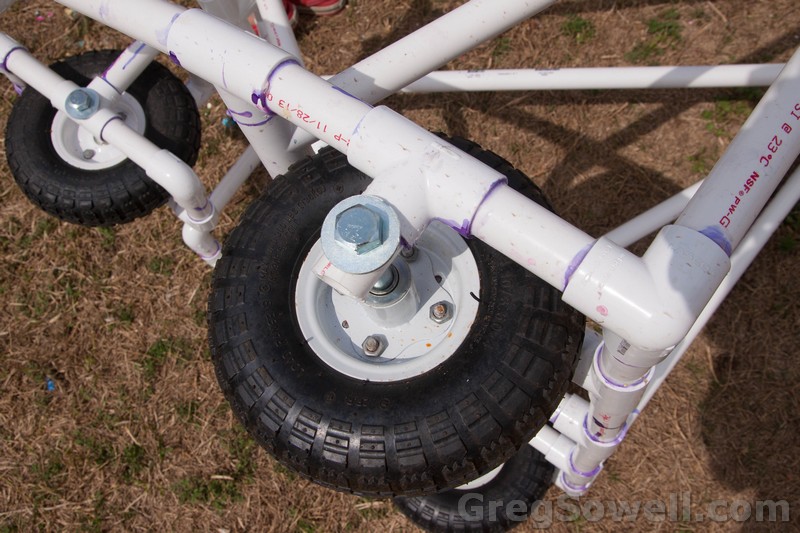
Back wheels. I used PVC to act as spacers on the wheel hubs.
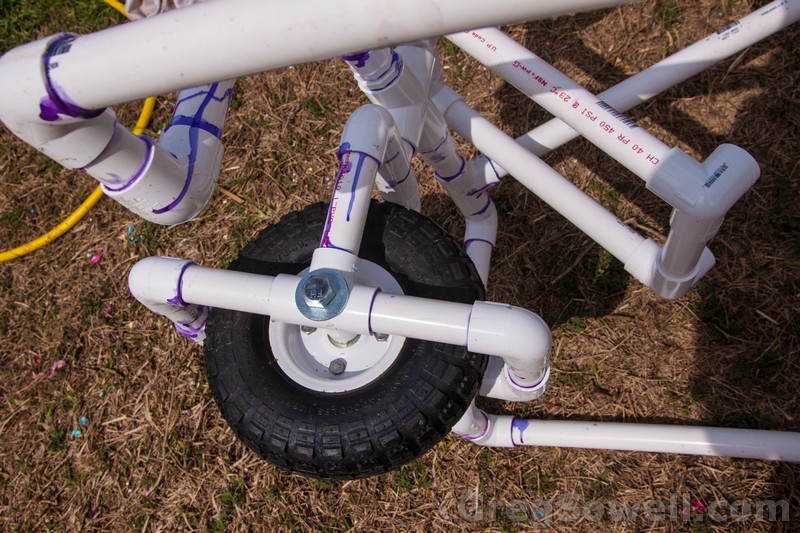
Front wheel floats off of a larger 1 and a quarter cross.
I’ve written an extensive article here about Layer 2 protection on wired networks. I would reference this first for full details. In a nutshell DHCP snooping prevents a user from acting as a rogue DHCP server. It also builds a binding table that can be used with ARP inspection to prevent man in the middle attacks.
The way it works is your client requests an IP via DHCP, then the switch records the information as the offer returns to you…simples…or is it?
Cisco 3550/3560 switches by default create and send option 82 with your DHCP request. There are a couple of good articles on it here and here.
Option 82 sends back additional information relating to the clients “physical attachment” to the network. It is usually seen in relation to DHCP relaying to help the server determine where the client was sourced from to know which ip pool to allocate an address from. There is a field called the “giaddr” field that is passed along, which is used to determine where the request came from. By default the 3550/3560 sets the giaddr field to 0 when snooping is enabled.
Mikrotik made some change to the DHCP server implementation in version 6, which has an odd effect. When the MTK DHCP server see’s option 82 come in and the giaddr is set to 0 it will send back a DHCP offer packet that does NOT contain a default gateway or subnet mask. So in effect your clients will NEVER WORK!!!!!
Packet capture from a normal DHCP offer.
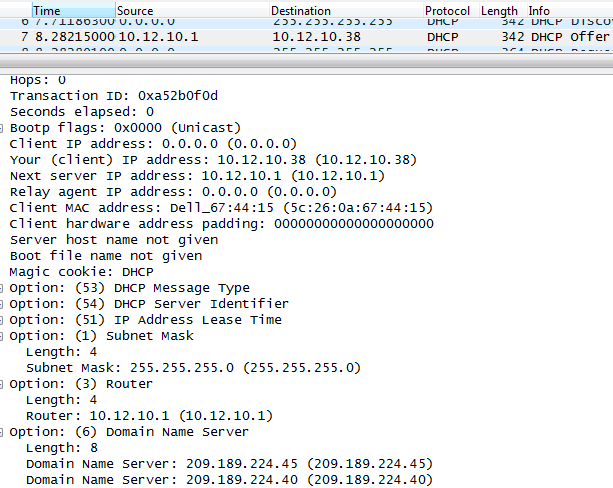
Working DHCP offer. Note how it has gateway/subnet/DNS info passed.
Packet capture from a 3550 with standard snooping.
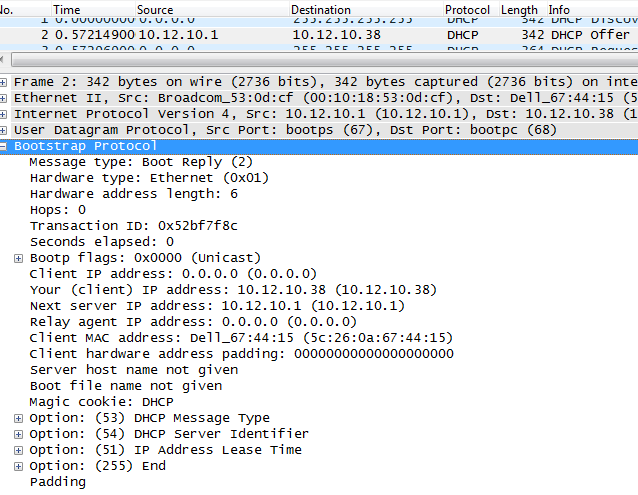
Notice that the server pretty much only offers an IP and no additional information…no gateway/subnet/DNS!
Oh muh gurrrd…whuut dew weee dewwwwww?!?! We can actually issue a simple command on the switch that will fix everything:
1 | no ip dhcp snooping information option |
This simple command disables the default option 82 behavior of the switch, and just passes on a standard DHCP request. The Mikrotik V6 DHCP server sees the standard request and passes back a standard DHCP offer…and everything works as it should.
I don’t want to even mention the couple of hours of work it took me to figure this one out. No amount of googling provided the answer. It took several wireshark packet captures to get me on the correct track, and then some good old fashioned experimentation to close the circle.
Have fun and happy routing(or switching as the case may be). 😉
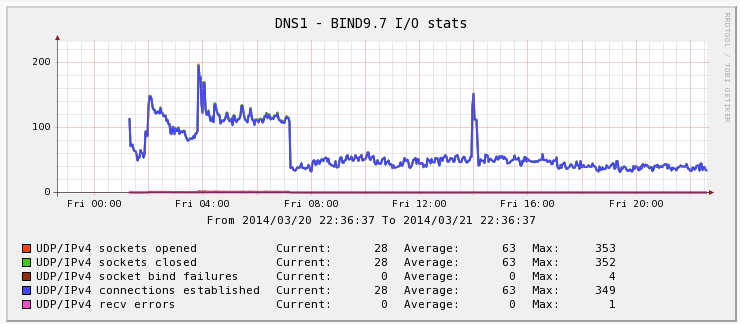
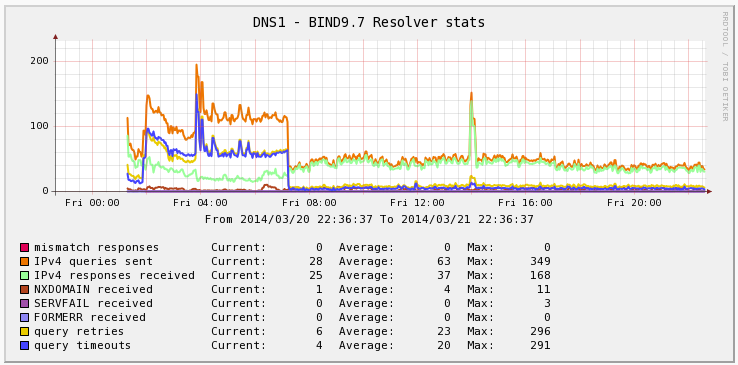
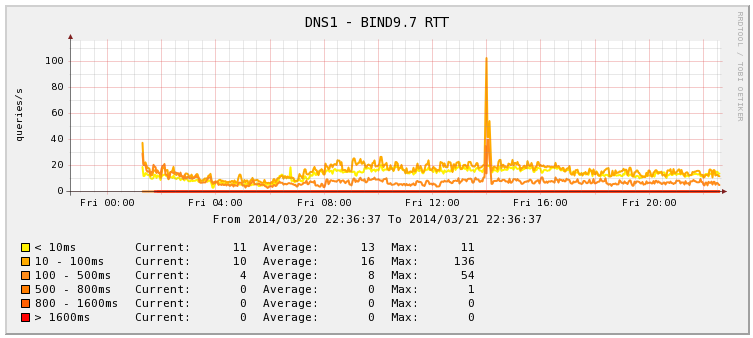
If someone puts in a support ticket saying they are having DNS issues with your server, what do you do to quantify how your server is acting…? This is the “boat” I found myself in a while back. I decided to use cacti to poll my devices. I happen to run Bind9. I built off of a handy template I found on the Cacti forums. Though I did end up modifying it quite a bit. You can grab my version here: Cacti-Bind (4393 downloads) .

Install Steps
You can follow the Template steps, but I’ve got some tweaks specific for my Centos CactiEZ install.
Install SNMP on your DNS server
1 | yum install net-snmp net-snmp-utils net-snmp-devel |
Edit snmpd.conf [/etc/snmp/snmp.conf]
# Set new community string
1 | com2sec notConfigUser default NewString |
Allow your new string to view more of the snmp tree.
1 | view systemview included .1.3.6.1 |
Add DNS query extend
1 2 | # DNS query extend .1.3.6.1.4.1.18689.0.1 dnscache-stats /root/bin/runstats.sh |
Restart snmp service
1 | service snmpd restart |
Be sure to set the SNMPD service to start on boot.
Edit your linux firewall to allow your cacti machine to access UDP port 161 on the DNS server.
Create the folder /var/cache/bind and make it writable.
Edit /etc/named.conf
Set “statistics-file “/var/named/data/named_stats.txt”;” to statistics-file “/var/cache/bind/named.stats”;
Reload your named service
1 | service named restart |
From the CLI issue “rndc stats”.
1 | rndc stats |
Ensure that the stats file is generated in /var/cache/bind. If it produces an RNDC warning[WARNING: key file (/etc/rndc.key) exists, but using default configuration file (/etc/rndc.conf)] you will need to:
Copy the dnsstats.pl and runstats.sh files to the /root/bin folder and ensure they are executable.
On Cacti Server
Add the modified bind-stats.sh file(ensure it is executable) to the scripts folder.
Import your cacti xml file.
Live long and prosper.