

I placed the script int he root folder as /root/poptest.sh.
1 2 3 4 5 6 7 8 9 10 11 12 13 | #!/bin/bash
echo "x" | openssl s_client -connect 127.0.0.1:995 > /root/pop3test.txt
if grep -Fq "POP3 server ready" /root/pop3test.txt
then
# code if found
echo "found"
else
# code if not found
echo "not found"
service zimbra restart
fi |
I then created a cron job that runs every 15 minutes and calls the script.
It uses the openssl client to connect to the server. It then pipes this to a file named pop3test.txt. After this it checks the file for “POP3 server ready” which is the all clear message at the end of the file.
If it passes it does nothing. If it fails it restarts the zimbra service(this happens to be running on a zimbra server).
Good luck and happy popping.
So new Belkin routers will give you serious heartburn on your Mikrotik Hotspots.
In a normal hotspot server, you will hijack all internet traffic until a user either accepts trial access or logs in. This normally works great with any PC/MAC/Router…unless you are using a newer Belkin router.
If a Belkin router can’t connect to the internet it will take you to an internal page saying “Everything is terrible and life is over.” Since it grabs your traffic, it will never allow you to get to the hotspot page…and thus never be able to authenticate.
So when the Belkin boots up and pulls and IP it tries to ping heartbeat.belkin.com. If it is unable to access the site it thinks everything is down. The easiest thing to do is add an ip exclusion:
1 2 | /ip hotspot walled-garden ip add action=accept comment=belkin-router-bypass disabled=no dst-address=67.20.176.130 |
The routers will be able to reach the internet, and all will be right with the world.
Alternately, and vastly more fun, is to set a DNS entry in the Mikrotik for heartbeat.belkin.com to resolve to 127.0.0.1. This way the router would just ping itself and thus always remain available. This also means that if Belkin were to change the IP that this address resolves to it would continue to work 😛
1 2 | /ip dns static add address=127.0.0.1 name=heartbeat.belkin.com |
Justin added Netgear to my list with:
1 2 | /ip hotspot walled-garden ip add action=accept comment=Netgear.com disabled=no dst-address=206.16.44.90 |
JJ just added Microsoft internet detection bypass:
1 2 3 4 | /ip hotspot walled-garden ip add action=accept comment=WindowsNetDetect disabled=no dst-address=131.107.255.255 /ip hotspot walled-garden add comment=WindowsNetDetect dst-host=*.msftncsi.com" |
![]()
It’s been ages since we’ve gotten together, but we had a pretty good showing. Greg Sowell, Tom Smyth, Justin Miller, Mike Hammet, and JJ Boyd talk shop.
Some of the things discussed:
GPON
airFiber/New Ubiquiti Gear
New Mikrotik gear – Thanks for assembling everything Andrew Cox!
New Mimosa gear
Observium monitoring tools
Cacti monitoring tools
A little about IPTV and content rights.
Click here to view the post!
Over the weekend I was at a work function with several of my fellow employees. We ended up playing a board game called Settlers of Catan. I was being very resistant to playing it at first. I mean, I like playing Trivial Pursuit and Pictionary, but these long involved strategy games just don’t do it for me…but why is that?
I started to think about on a run this morning. I know I used to like strategy games like Warcraft and Command and Conquer, but they hold little interest for me know. I think I hit on the answer at about mile 3. I live in a strategy game…only with much higher stakes. The balance of networking that I do on a daily basis if done wrong could cost thousands, tens of thousands, or even hundreds of thousands in damages if done wrong. That and my employment would be in question as well as the future long-term stability of my family’s well being. Beyond that we work with dangerous equipment on a semi-regular basis.
When comparing a few brick cards or lumber, how can a serious board game compare? I suppose that’s why I just stick with the trivia and drawing dumb picture games…keeps life light. Oh, and BTW, I won Catan…like a boss!
What’s new in 6.13
*) console – comments are now accepted where new command can start, that is,
where ‘/’ or ‘:’ characters can be used to start new command, e.g.
/interface { # comment until the end of the line
print
}
*) backup – backups by default are encrypted now (with user password).
To use backup on older versions, you should disable encryption with dont-encrypt
flag when creating it;
I’m assuming this means those sites that will decrypt your passwords won’t work any more.
*) files with ‘.sensitive.’ in the filename require ‘sensitive’
permission to manipulate;
My.Grocery.List.sensitive.txt
*) lcd – reduce CPU usage when displaying static screens;
*) l2tp – fixed occasional server lockup;
*) pptp – fixed memory leak;
*) sstp – fixed crashes;
Nice fix on the leaks and crashes. I was thinking of trying out an SSTP concentrator 😉
Radius Manager is a product from DMA softlabs that acts as a radius authentication system for your wireless or hotspot clients. I personally use it for my hotspot clients in Mikrotik.
The point of this article is to show you how to add some redundancy to your configuration. The software is licensed via a MAC address on one of your server’s NICs. I think for the price of the software is great, so I would never advocate a method to circumvent licensing. What I’m showing you how to do is simply setup a backup box for authentication, not administration. When you duplicate the server as shown below the web GUI is no longer available…the box is only good for authentication; it will keep your clients working while you get the main box going again.
Step one is to have a valid, licensed, working build.
I, as most of you, installed my server on VMWare as a virtual guest. Duplicate your guest VM and move it to another VMWare host. The easiest way to do this is to browse your datastore, highlight the files, copy them, then create a new folder on the target VMWare host, and paste the files.
Start your newly duplicated VM and tell the system you copied it.
Edit your interface configuration in the server and give it a new IP address.
Edit the system hostname:
/etc/sysconfig/network Set hostname= to your new hostname.
/etc/hosts Set your hostname correctly to the new IP.
Use the hostname command from the cli to set your new hostname
1 | hostname my.new.hostname |
Edit the raddb client file to allow all clients to connect. When you use radius manager and add a new NAS, it manually updates the raddb client file, then restarts the radiusd service. Since radius manager isn’t running on your duplicated server you either need to manually update the config file with each NAS update or put a catchall client in the list.
/usr/local/etc/raddb/clients.conf
1 2 3 4 | client 0.0.0.0/0 {
secret = SharedBackupPassword
shortname = BackupClients
} |
Now that this is done, clients can technically authenticate off of this box…once you add additional radius servers to your hotspot that is. One thing…there is no replication between the master radius box and this backup, so everything is stale. Let’s fix that!
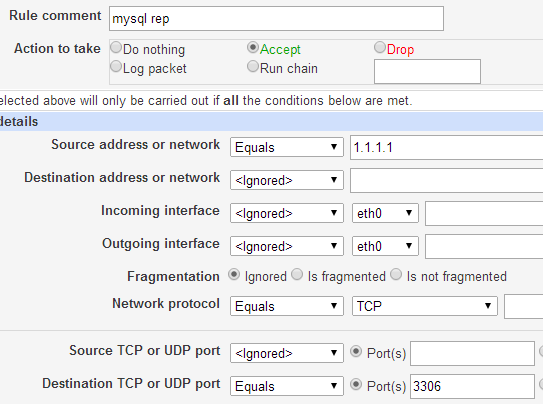
First allow TCP 3306 in the input chain firewall on both of your servers.
Configure MySQL replication:
On the master server:
Edit /etc/my.cnf and add the following to the [mysqld] section:
1 2 | log-bin=mysql-bin server-id=1 |
Restart the mysql service:
1 | service mysqld restart |
Create a replication user from the mysql CLI:
1 2 | CREATE USER 'replication'@'%.mydomain.com' IDENTIFIED BY 'slavepass'; GRANT REPLICATION SLAVE ON *.* TO 'replication'@'%.mydomain.com'; |
From the mysql CLI issue “SHOW MASTER STATUS;” and record the “file” and “position”.
On the slave server:
Edit /etc/my.cnf and add the following to the [mysqld] section:
1 | server-id=2 |
From the mysql CLI issue:
1 2 3 4 5 6 | CHANGE MASTER TO MASTER_HOST='master_host_name', MASTER_USER='replication_user_name', MASTER_PASSWORD='replication_password', MASTER_LOG_FILE='recorded_log_file_name', MASTER_LOG_POS=recorded_log_position; |
From the same CLI issue:
1 | slave start; |
You can verify replication status via the CLI with:
1 | show slave status\G |
The easiest thing to do now is to reboot your secondary server.
Any changes you make to Radius Manager on the primary box should automatically replicate to our new backup box. If for some reason your primary box fails, clients can still authenticate off of your secondary box until you can stand the primary back up.
Thanks and happy routing guys.
One man’s lazy is another man’s efficient. I’m the most efficient guy you know 😛
Prepending is adding your AS number to BGP NLRI multiple times to make a set of routes look further away and thus less preferred.
Without Prepending:
1 2 3 | Router# show ip bgp 1.1.1.0/24 BGP routing table entry for 1.1.1.0/24, version 555663701 65001 4323 15169, (received & used) |
With Prepending:
1 2 3 | Router# show ip bgp 1.1.1.0/24 BGP routing table entry for 1.1.1.0/24, version 555663701 65001 65001 65001 4323 15169, (received & used) |
As you can see, in the second entry with prepending the AS distance to the route was 2 AS hops further away, and thus less preferred.
Say for example a customer wants you to prepend every route to them. The customer could just adjust local preference on their side, but if they aren’t comfortable with that, you can do the adjustment to prepending for them.
First, we create a route map that will do the prepending:
1 2 3 | route-map bgp->prepend permit 10 !create the map description :: Prepend 2 times to routes !always add a description ALWAYS set as-path prepend 65001 65001 !add the prepending command |
Normally on a route-map statement you are required to use a “match” command. In the match command you will use something like an access-list or a prefix-list to specify which NLRI to act upon. In our case we wanted to act on everything. If you simply omit the match statement it uses an implicit “any”, and will capture everything.
We then add the route-map to the neighbor:
1 2 3 4 5 6 | router bgp 65001 !enter your BGP process address-family ipv4 !enter the v4 address family neighbor 10.0.0.1 route-map bgp->prepend out !assign our new route-map to the peer outgoing exit !get back to config mode exit !get back to enable mode clear ip bgp 10.0.0.1 soft out !do a soft clear on the peer to send the new prepending towards the |
That’s just about as few lines as you can use to prepend everything. I like using route-maps like this because if later on down the road I want to adjust them again, I just add an incremented statement 🙂