


I recently had the need to use Hashicorp Vault with Ansible to store passwords-n-such, and I thought “Oh I’m sure this is simple.” Several hours later I realized “It’s not so simple.”
I’ve put this together to be used in a LAB environment. The install method is good for production, but my configuration certainly is not LOL.
**I designed the playbook to work with Centos7, though I believe it will work with much more**
First is the install playbook that can be found here in my github account.
This playbook will go out and grab vault_1.4.1(which you can update to a different version in the script if you like), download it, unzip it, install it, setup a service file, create a base config file, and start the service. You will really need the “*.j2” template files found in the main folder here.
The install uses(at the time of this writing), the below config file:
1 2 3 4 5 6 7 8 9 10 11 12 13 14 15 16 17 18 19 20 21 22 23 24 | #
# This is a sample dev server config.
#
# !! IT IS INSECURE !!
# !! DO NOT USE IN PROD !!
#
# backend "inmem" {}
backend "file" {
path = "/mnt/vault/data"
}
listener "tcp" {
address = "127.0.0.1:8200"
tls_disable = 1
}
listener "tcp" {
address = "{{ ansible_host }}:8200"
tls_disable = 1
}
disable_mlock = true |
The config file makes the server listen on both 127.0.0.1 and whatever IP the Ansible server is using to connect to the server on.
It’s also disabling tls support(which should NOT be used in production; this is me whipping it up for my testing purposes).
It is also using simple file storage which isn’t suggested either. The deploy script will create the folder for the data file and sets permission for the vault user to access it.
Since the next couple of commands require accessing the vault server directly, try setting these env variables to make it easy. If this doesn’t help sort it, just use the “-address http://127.0.0.1:8200” option to your commands.
1 2 | export VAULT_ADDRESS='http://127.0.0.1:8200' echo "export VAULT_ADDR=http://127.0.0.1:8200" >> ~/.bashrc |
Once the deploy script has run the vault needs to be initialized, which is done only a single time. Once you initialize it, it will spit out the root token(used for authentication) and 5 key shards used to “unseal” the vault file.
1 2 3 4 5 6 7 8 9 10 11 12 13 14 15 16 17 18 19 20 | vault operator init Unseal Key 1: rZAdDj0KyuwJKZa5/Cxpt3e0G5rjPFHyQgZ/KGwawcol Unseal Key 2: 7wL3eOZumgL36Kf+0i0BoPj7rG6xOYsJNUZpqvKYfirx Unseal Key 3: ZijK5fK7MFRPW90kJ1TRAP8ZznsZYtZ/x8KrX9JcEXWw Unseal Key 4: no7+kdAmn8RdN/h+gULkn076pVhJJYqveVSdak14LVoE Unseal Key 5: hfY07AW9R6abky7JgsIDGmGgkxY6EqjwCe9+8UKkcdQX Initial Root Token: s.fKYto48B80ObQrQkorMoexJv Vault initialized with 5 key shares and a key threshold of 3. Please securely distribute the key shares printed above. When the Vault is re-sealed, restarted, or stopped, you must supply at least 3 of these keys to unseal it before it can start servicing requests. Vault does not store the generated master key. Without at least 3 key to reconstruct the master key, Vault will remain permanently sealed! It is possible to generate new unseal keys, provided you have a quorum of existing unseal keys shares. See "vault operator rekey" for more information. |
If you get an error like this “Error initializing: Put https://127.0.0.1:8200/v1/sys/init: http: server gave HTTP response to HTTPS client”, then try adding the address to the above command:
1 | vault operator init -address http://127.0.0.1:8200 |
The idea of the vault is that it defaults to sealed. You first have to take 3 keys and apply them to the vault to unlock it. In reality you would separate those keys for safety…imagine it like a bank vault where there are 5 keys and it takes three people with keys to unlock it. You can do this manually each time you want to unlock it with:
1 2 3 | vault operator unseal rZAdDj0KyuwJKZa5/Cxpt3e0G5rjPFHyQgZ/KGwawcol vault operator unseal 7wL3eOZumgL36Kf+0i0BoPj7rG6xOYsJNUZpqvKYfirx vault operator unseal ZijK5fK7MFRPW90kJ1TRAP8ZznsZYtZ/x8KrX9JcEXWw |
Technically you should put the vault key on the command line because it shows up in the history, but this is just for lab use.
If you reboot the server the vault will auto seal back up and you have to unseal it again. In production this isn’t such a big deal, but in my lab I’ll have this thing off most of the time, so to make it easier I created a script that is called when the server boots to auto unseal it(/root/unseal_vault.sh):
1 2 3 4 5 6 | #!/bin/bash vault operator unseal -address http://127.0.0.1:8200 rZAdDj0KyuwJKZa5/Cxpt3e0G5rjPFHyQgZ/KGwawcol sleep 2 vault operator unseal -address http://127.0.0.1:8200 7wL3eOZumgL36Kf+0i0BoPj7rG6xOYsJNUZpqvKYfirx sleep 2 vault operator unseal -address http://127.0.0.1:8200 ZijK5fK7MFRPW90kJ1TRAP8ZznsZYtZ/x8KrX9JcEXWw |
You can see in the commands I added the -address command for it use; for some reason it kept trying to use https when it wasn’t specified.
I then changed it to executable:
1 | chmod +x /root/unseal_vault.sh |
I then create the service file(/etc/systemd/system/unseal_vault.service):
1 2 3 4 5 6 7 8 9 10 | [Unit] Description=Unseal the vault [Service] Type=idle ExecStart=/root/unseal_vault.sh TimeoutStartSec=0 [Install] WantedBy=default.target |
After that I reload the daemon and enabled the unseal service:
1 2 | systemctl daemon-reload systemctl enable unseal_vault.service |
I start by logging in:
1 | vault login s.fKYto48B80ObQrQkorMoexJv |
Replace the token here with the root token supplied during initiation.
Now that is out of the way I’ll create a secrets engine with the keyvault command(where keys can be stored):
1 | vault secrets enable -path=secret kv |
The secrets engine name is secret.
I’m now going to populate it with some pairs:
1 | vault kv put secret/2020 password=redhat |
If I want to check the pair I can do:
1 2 | vault kv get -field=password secret/2020 redhat |
When I “put” the keypair in I made it password=redhat, but it could have been pie=apple or taco=delicious. I just made it password= because I figured it would make things simpler in my ansible scripts.
There’s also a test ansible script in the repo above that will poll using the root key I got from initialization:
1 2 3 4 5 6 7 8 9 10 11 12 13 14 | [root@ansible1 ansible]# ansible-playbook hashicorp-vault-pw.yml
PLAY [test vault] ********************************************************************************************
TASK [register password from vault] **************************************************************************
ok: [localhost]
TASK [Return all secrets from a path] ************************************************************************
ok: [localhost] => {
"msg": "redhat"
}
PLAY RECAP ***************************************************************************************************
localhost : ok=2 changed=0 unreachable=0 failed=0 skipped=0 rescued=0 ignored=0 |
You will likely need to adjust your firewall to allow TCP/8200 in since this is the port the Vault API uses for access.
Adding To Ansible Automation Platform 2.X
First, here’s the quick documentation on configuring a machine credential for this, though it is not specifically talking about vault.
Setup a “HashiCorp Vault Secret Lookup” credential:
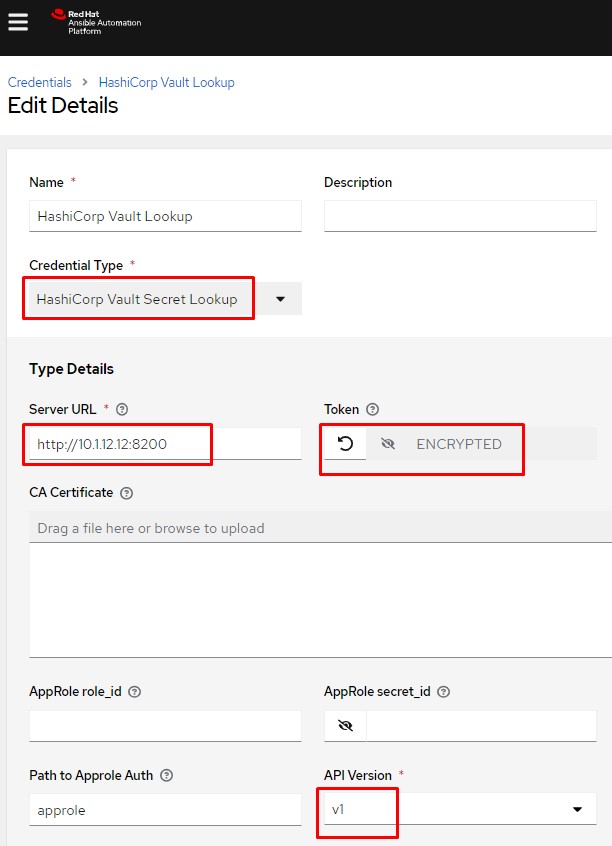
You can see I specify the URL of the server including the port used, then enter my access token, and last I’m using API v1.
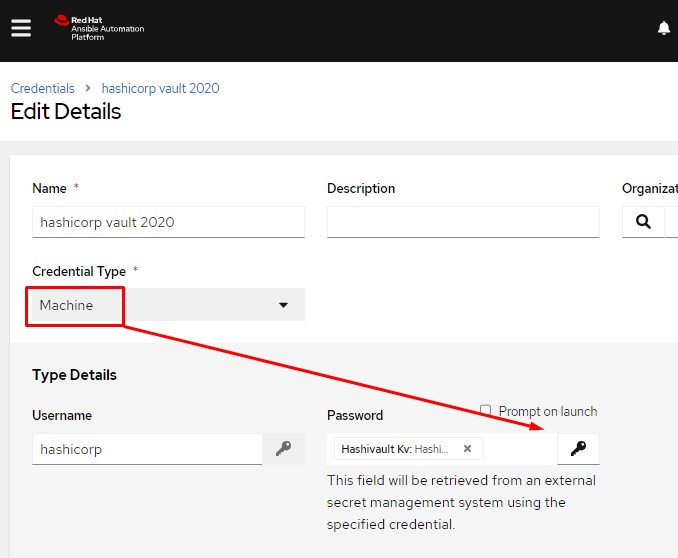
Next I setup a machine credential that will access the hashicorp vault info setup above. Notice I hardcoded a username, but I want to do the lookup on the password. Instead of entering something in the password field I click the little key icon:
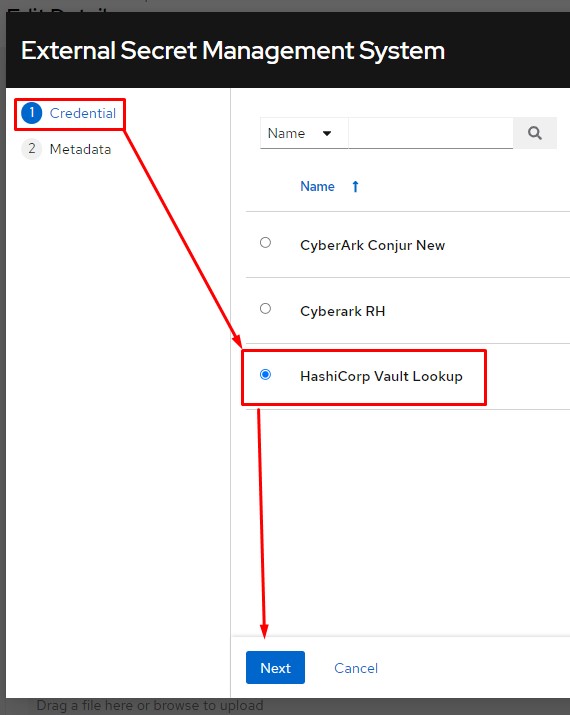
Once the key is clicked it will popup a screen that allows me to choose the vault lookup credential I just created:
I now put in my path to secret. This is vault named secret and keyvault named 2020.
After that I specify the key name; in my case I just named the key “password”.

After I click test it should popup a message saying everything passed. After that I simply click OK.
I can now use this machine credential as I would any other machine credential.
Conclusion
There’s an awesome tutorial on hashicorp vault I would highly recommend you spending 45 minutes to go through; it really gives you everything you need to start quickly playing with vault.
I hope this was helpful; good luck and happy vaulting!
I decided to make my Operation game a little more exciting/terrifying, pick your own adjective, by having it shock me when I mess up. Gotta keep quarantine interesting, no?
The build uses:
Here’s a video of me playing and building it:
Here’s the arduino code for your review:
1 2 3 4 5 6 7 8 9 10 11 12 13 14 15 16 17 18 19 20 21 22 23 24 25 26 27 28 29 30 31 32 33 34 | int progLoop = 1; //progressive counter loop. Also used for standard non prog when at 1
int switchState = 0; //switch read
void setup() {
// put your setup code here, to run once:
//Serial.begin(9600); //setup the serial port so we can monitor it while testing
pinMode(2, INPUT_PULLUP); // switch
pinMode(10, OUTPUT); // relay
pinMode(13, OUTPUT); // led
}
void loop() {
int sensorValue = analogRead(A0); //read analog sensor(checking if there is voltage coming from the game.
switchState = digitalRead(2); //read the pin that the switch is on.
// Convert the analog reading (which goes from 0 - 1023) to a voltage (0 - 5V):
float voltage = sensorValue * (5.0 / 1023.0); //voltage read. It is two AA batteries so 3V max
//Serial.println(voltage); //debug output of serial info for testing
if (switchState == LOW) {
progLoop = 1; //reset this so you don't get wammied once moving the switch LOL
}
if (voltage > 2) {
//voltage is coming from the game, so enable the led and relay
digitalWrite(10, HIGH);
digitalWrite(13, HIGH);
delay(200 * progLoop); //how long does it sleep - how long are you shocked. AKA enable tens unit, then sleep for as long as you shoul dbe shocked.
if (switchState == HIGH) {
progLoop = progLoop + 1; //if the progressive switch is on, then keep incrementing it each time the game buzzes
}
} else {
//no voltage, so turn the LED/relay off
digitalWrite(10, LOW);
digitalWrite(13, LOW);
}
} |

This week Greg, Mike, and Thomas(he’s back to his screwed up sleep schedule LOL) have a chat.
This week we talk about:
MTK adding UNI-2 support for 5ghz bands in NA
Wireguard coming to MTK
MTK script to add neighbors to interface descriptions on CRS3XX switches
Ansible quirk with routeros module and commas
64k OOB sim card from tmobile ~$50 a year w/static IP
nvidia finishes Mellanox buyout
nvidia buys Cumulus
CI/CD
TCL on Cisco IOS is super useful, and noone is using it
Dropping Waves
Ethernet Weirdness
Tomas wants to rant about text editors
Here’s the video:(if you don’t see it, hit refresh)
In one of my new build MDUs, the cabling got all scrambled so my in room Mikrotik routers got all scrambled up. I needed a way to go through each switch and update the interface comment to match what room it is associated with.
Each CPE is named Room101, Room225, etc. If I connect to the switch and issue a “/ip neighbor print detail” I get:
1 2 3 4 5 6 7 8 9 10 11 12 13 14 15 16 | [admin@IDF1-Sw1] > ip neighbor print de 0 interface=ether1,bridge1 mac-address=B8:69:F4:CC:63:E1 identity="Room216" platform="MikroTik" version="6.46.5 (stable)" unpack=none age=47s interface-name="bridge1/ether1" system-description="MikroTik RouterOS 6.46.5 (stable) RBD52G-5HacD2HnD" system-caps=bridge,wlan-ap,router system-caps-enabled=bridge,wlan-ap,router 1 interface=ether1,bridge1 mac-address=B8:69:F4:CC:63:E6 identity="Room216" platform="MikroTik" version="6.46.5 (stable)" unpack=none age=47s uptime=2d2h56m23s software-id="W3J3-TN8Y" board="RBD52G-5HacD2HnD" ipv6=no interface-name="bridge1/ether1" system-caps="" system-caps-enabled="" 2 interface=ether2,bridge1 mac-address=B8:69:F4:CC:64:0B identity="Room260" platform="MikroTik" version="6.46.5 (stable)" unpack=none age=41s interface-name="bridge1/ether1" system-description="MikroTik RouterOS 6.46.5 (stable) RBD52G-5HacD2HnD" system-caps=bridge,wlan-ap,router system-caps-enabled=bridge,wlan-ap,router 3 interface=ether2,bridge1 mac-address=B8:69:F4:CC:64:10 identity="Room260" platform="MikroTik" version="6.46.5 (stable)" unpack=none age=41s uptime=2d2h55m26s software-id="7FC3-R521" board="RBD52G-5HacD2HnD" ipv6=no interface-name="bridge1/ether1" system-caps="" system-caps-enabled="" |
I’m connecting these hAPac^2s to a CRS328 switch(an awesome combo!). I need to write a script that will list the neighbor table, filter on just ether interfaces and also filter to make sure the identity of the remote device starts with “Room”.
The script itself.
1 2 3 4 | :local cpes [/ip neighbor print detail as-value where interface~"ether" and identity~"Room"];
:foreach cpe in=$cpes do={
/interface set [/interface find name=[:pick ($cpe->"interface") 0 [:find ($cpe->"interface") "b"]]] comment=($cpe->"identity");
} |
The script in terminal copy/paste form:
1 2 3 4 5 6 7 8 | /system script
add dont-require-permissions=no name=interface-comments owner=admin policy=\
ftp,reboot,read,write,policy,test,password,sniff,sensitive,romon source=":local cpes [/ip neighbor print detail as-value where interf\
ace~\"ether\" and identity~\"Room\"];\r\
\n:foreach cpe in=\$cpes do={\r\
\n /interface set [/interface find name=[:pick (\$cpe->\"interface\") 0 [:find (\$cpe->\"interface\") \"b\"]]] comment=(\$cpe->\"i\
dentity\");\r\
\n}" |
Here’s an example of it alllllll compiled into one line for use with Ansible:
1 | :local cpes [/ip neighbor print detail as-value where interface~"ether" and identity~"Room"]; :foreach cpe in=$cpes do={/interface set [/interface find name=[:pick ($cpe->"interface") 0 [:find ($cpe->"interface") "b"]]] comment=($cpe->"identity");} |
Speaking of ansible you can find the playbook here.
Completion of the script looks like this:
1 2 3 4 5 6 7 8 9 10 11 12 13 14 15 16 17 18 19 | [admin@IDF1-Sw1] /interface> print
Flags: D - dynamic, X - disabled, R - running, S - slave
# NAME TYPE ACTUAL-MTU L2MTU MAX-L2MTU MAC-ADDRESS
0 RS ;;; Room216
ether1 ether 1500 1592 10218 CC:2D:E0:63:4F:20
1 RS ;;; Room260
ether2 ether 1500 1592 10218 CC:2D:E0:63:4F:21
2 RS ;;; Room270
ether3 ether 1500 1592 10218 CC:2D:E0:63:4F:22
3 RS ;;; Room258
ether4 ether 1500 1592 10218 CC:2D:E0:63:4F:23
4 RS ;;; Room272
ether5 ether 1500 1592 10218 CC:2D:E0:63:4F:24
5 RS ;;; Room266
ether6 ether 1500 1592 10218 CC:2D:E0:63:4F:25
6 RS ;;; Room256
ether7 ether 1500 1592 10218 CC:2D:E0:63:4F:26
7 RS ;;; Room264
ether8 ether 1500 1592 10218 CC:2D:E0:63:4F:27 |
In the above scripts you can edit the interface~”ether” and identity~”Room” to be more tailored to your needs.
Good luck and automate all the things with Ansible!
When you are using commas in a playbook with Ansible on the routeros module you will have a bad time unless you do this one special trick.
First here’s my example playbook:
1 2 3 4 5 6 7 8 9 10 11 | ---
- name: wlan2 radio tuning
connection: network_cli
gather_facts: false
hosts: mtk3
tasks:
- name: Add vlan config back for user vlans
routeros_command:
commands: "/interface bridge vlan add bridge=bridge1 tagged=ether1 untagged=ether2,ether3,ether4,ether5,wlan2 vlan-ids={{ hostvars[inventory_hostname]['user_vlan'] }}" |
When I run this it just fails.
When I run it with debugging -vvv I get:
1 2 3 4 5 6 7 8 9 10 11 12 13 14 15 16 17 18 19 20 21 22 | fatal: [mtk3]: FAILED! => {
"ansible_facts": {
"discovered_interpreter_python": "/usr/libexec/platform-python"
},
"changed": false,
"invocation": {
"module_args": {
"commands": [
"/interface bridge vlan add bridge=bridge1 tagged=ether1 untagged=ether2",
"ether3",
"ether4",
"ether5",
"wlan2 vlan-ids=201"
],
"interval": 1,
"match": "all",
"retries": 10,
"wait_for": null
}
},
"msg": "command timeout triggered, timeout value is 30 secs.\nSee the timeout setting options in the Network Debug and Troubleshooting Guide."
} |
You can see that it interprets the “untagged=ether2,ether3,ether4,ether5,wlan2” portion as a list and tries to put each one on a separate line, which totally breaks the command.
I tried a million different things including putting the interface list into an actual list, then joining it back together in the command with the join command:
1 2 3 | - name: Add vlan config back for user vlans
routeros_command:
commands: "/interface bridge vlan add bridge=bridge1 tagged=ether1 untagged={{ my_joined_list | join(',') }} vlan-ids={{ hostvars[inventory_hostname]['user_vlan'] }}" |
But the output shows it does the same thing…:
1 2 3 4 5 6 7 8 9 10 11 12 13 14 | fatal: [mtk3]: FAILED! => {
"ansible_facts": {
"discovered_interpreter_python": "/usr/libexec/platform-python"
},
"changed": false,
"invocation": {
"module_args": {
"commands": [
"/interface bridge vlan add bridge=bridge1 tagged=ether1 untagged=ether2",
"ether3",
"ether4",
"ether5",
"wlan2 vlan-ids=201"
], |
I eventually found this bug report, which explains that the routeros module expects to see a list of commands, so if you just slightly modify the command structure it will interpret things correctly *sigh*.
Here’s the working version of the task:
1 2 3 4 | - name: Add vlan config back for user vlans
routeros_command:
commands:
- "/interface bridge vlan add bridge=bridge1 tagged=ether1 untagged=ether2,ether3,ether4,ether5,wlan2 vlan-ids={{ hostvars[inventory_hostname]['user_vlan'] }}" |
Notice that all I did was move the command itself to a new line and add the “-” before it. Now it interprets everything as a single line, ignoring the commas.
I hope you find this to be useful, and possibly save you a good chunk of time!
This week Greg, Mike, and Andrew Thrift talk about the new hardware, and speculate on what’s next.
This week we talk about:
*Cambium Sponsor Deal*
Cisco offering online testing for certs…who’s next? (Greg hopes it’s Red Hat LOL)
Winbox 3.23 ctrlC and ctrlA work!
MTK CCR2004-1G-12S-2XS
CRS326-24G-2S+IN desktop switch
hAP AC3
Speculation on new CCR
Dream about new MTK switches
Fail2Ban, APF, CentOS, etc.
Greg had issues with tracking down a loop on a Netonix based network…so naturally we do an emergency routed upgrade.
Here’s the video:(if you don’t see it, hit refresh)