AWX derivatives are great tools for putting enterprise controls around your automation. Ascender brings the best of open source automation into one easy-to-install package, and now when you are ready to migrate from either AWX or Red Hat’s Ansible Automation Platform (AAP), you can with a few simple steps. It doesn’t stop there, though. You can migrate portions of your dev/test Ascender installs over to production, or simply use them as templates for Configuration As Code (CAC). The materials here will be showing how to do a 1 to 1 migration, but in the near future, I’ll be creating and demoing some interesting use cases for distribution across your enterprise.
Video Demo
Playbooks
All of my materials can be found here in my public repository.
I’m also using a few collections and tools:
Community.general – Used for some json_query filtering.
Controller_configuration – Awesome RH COP collection of roles used to interact with the awx.awx collection.
Awx.awx – Modules designed to easily interact with the API. This is already baked into the default Ascender EE.
Awxkit – A Python CLI tool for interacting with the API. This too is already baked into the default Ascender EE.
I’m going to break them into two categories: ones used for exporting information and those used for importing information.
Exporting
The primary file is export.yml. I’m not going to walk through every piece; rather, I’ll cover the important bits… or maybe those where I think I’m being particularly clever. 😉
  hosts: save-files

  vars:
    # These are the objects you wish to export. Be sure to comment out any you don't want.
    export_objects:
      - applications
      - credentials
      - credential_types
      - execution_environments
      - inventory
      - inventory_sources
      - job_templates
      - notification_templates
      - organizations
      - projects
      - schedules
      - teams
      - users
      - workflow_job_templates
First is the host section. Here I have a server that will act as a temporary file repository. Future versions will be saving all of these files to a git repository, but for now I wanted it to be as quick and simple as possible. So choose a server that can hold a few KB of files.
Next is the export_objects variable in the vars section. Any items in this list that aren’t commented out will be exported into their yaml formatted configuration file (then stored on the save-files host).
  environment:
    CONTROLLER_HOST: "https://{{ export_host }}"
    CONTROLLER_USERNAME: "{{ gen1_user }}"
    CONTROLLER_PASSWORD: "{{ gen1_pword }}"
    CONTROLLER_VERIFY_SSL: False
The awx.awx collection uses these environment variables to authenticate and connect to the API of the server that will be exporting data. You can set these variables in the vars section, hard code them here, or like me, you can securely pass them in from Ascender!
Once the export is complete, I copy these files into my repository in a directory named “configs.”
Importing
There was a LOT more work that had to be done on the import side. In fact, this is where I spent the majority of my dev time. There is a lot of formatting of variables, filtering of information, reconfiguring of variable structures, or outright creation of variables that had to be done… and lucky for you, it should just work now!
The primary file for importing information is import.yml. Again, I’ll only cover the important bits here, though all of my tasks have comments and descriptions.
    # These are the objects you want to import into the server.
    export_objects:
      - testing_value
      - applications
      - credentials
      - credential_types
      - execution_environments
      - projects
      - inventory
      - inventory_sources
      - job_templates
      - notification_templates
      - organizations
      - teams
      - users
      - workflow_job_templates
      - schedules
This is the exact same variable from the export.yml file. It defines what sections should be imported.
    # Add hosts and or groups when adding/updating inventories
    # By default inventories won't import hosts/groups, so setting these variables will control that.
    add_hosts: true
    add_groups: true
When you import an inventory, it only creates the inventory, which means none of the hosts or groups within it are imported. If you want those to be imported also, you modify these two variables. By default they are set to true, so if you import an inventory, then the hosts and groups will come along with it.
    # These are the users that won't be imported. Recall these users will have their passwords and keys wiped.
    # I'm using the admin user for importing so I want to ignore it.
    filter_user_import:
      - admin
When importing users, it’s often desirable to exempt some users. When user accounts are imported, their passwords, keys, etc. are wiped. I’m using the admin account for importing, so I exempt it.
    # List of schedule names to remove when importing.
    # By default I'm removing all of the system defaults
    schedules_to_remove:
      - 'Cleanup Job Schedule'
      - 'Cleanup Activity Schedule'
      - 'Cleanup Expired Sessions'
      - 'Cleanup Expired OAuth 2 Tokens'
When importing some schedules, you may want to ignore some. In my case, I’m removing any of the system defaults from the import (they will already be in the other host).
  environment:
    CONTROLLER_HOST: "https://{{ import_host }}"
    CONTROLLER_USERNAME: "{{ gen2_user }}"
    CONTROLLER_PASSWORD: "{{ gen2_pword }}"
    CONTROLLER_VERIFY_SSL: False
As in the export.yml file, you must set up the environment variable information here for the host you plan to import configurations to.
Once you hit the task section, we are entering what I call the “modification” section. This is where I do massive cleanup first to the variable files (just the copy in the Execution Environment (EE)). Some changes were easier to fix in the variable files before they were brought into memory.
Then all of the variable files are imported into memory, and after that another big round of cleanup/manipulation is done to the variables.
####### start importing various information

  - name: block and rescue for multiple attempts
    block:
    - name: Add credential types
      when: item == "credential_types"
      ansible.builtin.include_role:
        name: credential_types
      loop: "{{ export_objects }}"
    rescue:
    - name: Add credential types - second attempt
      ansible.builtin.include_role:
        name: credential_types
Last, we enter the importing section. This is where all of the data is actually pushed into the remote host.
You can see I use a block and rescue for each one of the tasks. Essentially, I just call the relevant role and it will push in the data using an asynchronous method, which means it fires multiple tasks in the background so that they will complete as quickly as possible. It then checks the status for each. This definitely speeds up the import process.
I noticed that hammering the API in this fashion also leads to failures when importing a lot of information at once. It’s for this reason I went with a block and rescue. If the initial attempt fails for some of the imports, it will then rerun the exact same role, and in my testing this usually does the trick.
Configure Ascender, AWX, or AAP
I won’t be doing the step-by-step here… if you are migrating automation platforms, I assume you already know how to add a project and create a job template. I will show you my simple modifications.
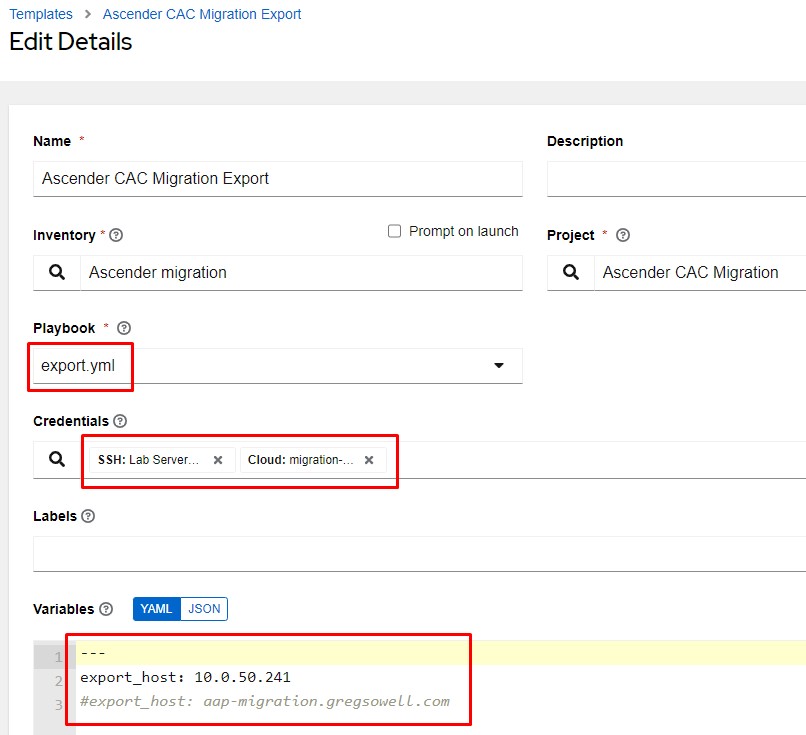
In the above example, I’m configuring the export playbook.
I created a custom credential that supplies the gen1_user and gen1_pword values.
I also added the machine credential to connect to my save-files host that will be holding the configs as they are created.
In the variables section, I’m adding the IP or Fully Qualified Domain Name(FQDN) of the host I’ll be connecting to and exporting info out of.
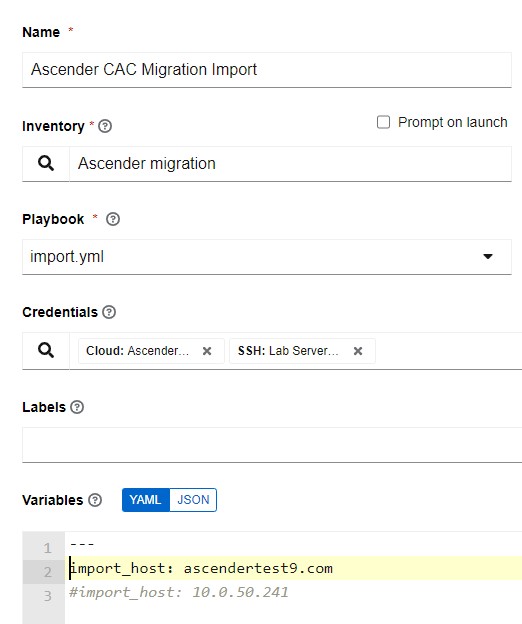
In this screenshot, I’m configuring the import job template.
Again, I have a custom credential that in this instance supplies gen2_user and gen2_pword.
Last in the variables section, I specify the import_host FQDN or IP address. This will be the host I’m pushing all of the configurations to.
Caveats
Passwords aren’t exported; therefore, they aren’t imported. If you are using a secrets engine, then this is a moot point as all of the private information is looked up at automation execution time.
This isn’t exporting or configuring specific Ascender configurations like: logging, authentication, etc. Right now it’s only (mostly) pulling/pushing configurations specific to automation. I plan to continually expand this, though.
Roles aren’t imported at this time (the awx.awx collection isn’t bringing that in).
User accounts aren’t currently optimally imported if you are also using an external authentication system. It will try and use the local account first before attempting external auth, so if it is imported manually, this can cause issues. You can either not import users or have all of your users login once to the new system first.
Conclusion
This is, perhaps, the most impactful automation I’ve created to date. I hope you can use it to test drive Ascender, or maybe just improve your backups 🙂.
This is V1.0 of this automation, so know that it isn’t yet in its final evolution. I implore you to let me know how I can improve it (again, I have very interesting variations on this that are coming soon). If you find bugs (I can’t test every scenario), please let me know, or contribute code if you can.
Thanks and happy migrating!
Leave a Reply