Creating And Using Execution Environments For The Ansible Automation Platform
As of version 2.0, AAP has replaced Python virtual environments with Execution Environments(EEs). In short it’s running all of your automations inside of containers. The advantages are many, but I’m not here to talk about why, rather I’m here to talk about the how. There is a lot of documentation on the various pieces(which I’ll link to here and there), but it’s not necessarily all put together in one place, so I’m aiming to do that here. This guide is really just showing how to get it done in the shortest time possible 🙂
**Quick Note** I’ve created an automated system for building and installing these EEs. You can find the blog post here that breaks everything down(includes a video!).
Second note: Nick Arellano has made a blog post of his EE journey here.
Installing The Tools
One assumption is that you already have AAP2.X installed/working, and you are ready to build some custom EEs.
Part of the AAP2.X install configures podman, which is Red Hat’s container engine. It should feel familiar if you have used docker before as many of the commands are identical. Podman will be used to pull containers down to my host(used to build my EEs), and it’s used to push them up to my container registry. Think of a container registry as a repo that stores containers for AAP to pull and use.
The next, and most important, tool is ansible-builder(I often just refer to it as builder). This tool will take all of the various collections and their requirements, and combine them together with a container to create my EEs. At the time of this writing it’s not auto-installed when installing AAP, but I’d expect it to very soon.
Installation is pretty simple:
If you are NOT an AAP subscriber you have to use the pip3 install method, which can be buggy(I’m mentioning this because I hit an issue with it this morning)
1 | pip3 install ansible-builder |
If you are an AAP subscriber, then the bundled installer has the RPM, it’s just not installed by default, so you will want to issue the following(adjust your path to the files accordingly) command:
1 | dnf reinstall /root/ansible-automation-platform-setup-bundle-2.1.0-1/bundle/el8/repos/python38-requirements-parser-0.2.0-3.el8ap.noarch.rpm /root/ansible-automation-platform-setup-bundle-2.1.0-1/bundle/el8/repos/ansible-builder-1.0.1-2.el8ap.noarch.rpm |
Pulling Containers To Build From
Red Hat is kind enough to build and supply us with some existing EEs that perform different functions. When you install AAP2.1 these are included in your control nodes.
At the time of this writing they are:
–
To build an EE, you have to have something to build from. If you don’t specify anything, it will use the base ansible-runner EE which really contains nothing…why start from scratch?
Keeping this in mind I’m going to pull and use the supported EE. First I’ll login to registry.redhat.io to pull content from my account:
1 2 3 4 | podman login registry.redhat.io Username: ***** Password: ***** Login Succeeded! |
Now that I’m logged in, I’ll pull the newest supported EE:
1 2 3 4 5 6 7 8 9 10 11 12 13 | podman pull registry.redhat.io/ansible-automation-platform-21/ee-supported-rhel8:latest Trying to pull registry.redhat.io/ansible-automation-platform-21/ee-supported-rhel8:latest... Getting image source signatures Checking if image destination supports signatures Copying blob d43e71f3b46c skipped: already exists Copying blob a873fa241620 skipped: already exists Copying blob 131f1a26eef0 skipped: already exists Copying blob 16b78ed2e822 skipped: already exists Copying blob 183445aff41b [--------------------------------------] 0.0b / 0.0b Copying config 6a3817e80b done Writing manifest to image destination Storing signatures 6a3817e80b0c03bac2327986a32e2ba495fbe742a1c8cd33241c15a6c404f229 |
^^You can see from the above it would have pulled the EE if I hadn’t already done it.
At this point I’ll do a quick list to see what I’ve got available:
1 2 3 4 5 | podman image list REPOSITORY TAG IMAGE ID CREATED SIZE quay.io/ansible/ansible-runner latest 43736a7bc136 2 days ago 761 MB quay.io/ansible/ansible-builder latest 16689884a603 2 days ago 655 MB registry.redhat.io/ansible-automation-platform-21/ee-supported-rhel8 latest 6a3817e80b0c 2 days ago 1.13 GB |
Build A Custom EE
Now that I’ve successfully grabbed the supported EE to build from, I’ll put together the files required.
In my home directory I’m going to create an “ee” folder to collect all of my custom EE files in.
Inside of that directory I’m creating a folder for my custom EE. I’m going to create one to utilize the community VMWare community as I’m automating against a slightly older VCenter. Keeping this in mind the folder will be named “vmware”. Now I’m going to create three required files.
The first file is “execution-environment.yml“. This is an instruction file for ansible-builder to tell it which components to use to build the EE:
1 2 3 4 5 6 7 8 9 10 11 12 13 14 15 16 17 18 19 20 | --- version: 1 build_arg_defaults: EE_BASE_IMAGE: 'registry.redhat.io/ansible-automation-platform-21/ee-supported-rhel8' # ansible_config: 'ansible.cfg' dependencies: galaxy: requirements.yml python: requirements.txt # system: bindep.txt # additional_build_steps: # prepend: | # RUN whoami # RUN cat /etc/os-release # append: # - RUN echo This is a post-install command! # - RUN ls -la /etc |
You will quickly notice that I have a lot of things commented out in the below; I didn’t choose to use them and they weren’t required for my configuration. For now I’ll start near the top with the “build_arg_defaults:” section. Here I’m listing the EE I’m building from exactly as it’s shown when I did the “podman image list” command.
Today I learned some pretty cool stuff. When building if you need some DNF install stuff(like unzip) done you can edit your file as below.
1 2 | dependencies: system: system-reqs.txt |
Contents of the system-reqs.txt file:
1 | unzip |
Also, some random commands can be done as in, download a zip file, unzip it, and execute a shell script inside:
1 2 3 4 5 6 | additional_build_steps:
append: |
RUN curl "aaaa.zip" -o /tmp/thing.zip && \
unzip /tmp/thing.zip && \
cd ./thing/install && \
echo "Yes" | ./FullInstallLookingForAYes.sh |
Next I can supply a custom ansible.cfg if I so choose; for this simple demo I just left it commented out.
After that is the “dependencies” section which is the only required portion really. Here I’m specifying a galaxy section(what collections to install), a python section(what python dependencies I need to install), and commented out here is the system section(what packages need to be installed with “DNF install”).
Last is the commented out “additional_build_steps” section. This allows arbitrary commands to be run before all the dependencies are placed as well as some appended to the end once everything is done.
Next is the galaxy “requirements.yml” file:
1 2 3 | --- collections: - name: community.vmware |
As you can see I just put in the list of collections to install. At run time, builder will connect to the requisite service and download the specified files.
Last is the python “requirements.txt” file:
1 2 | pyVmomi>=6.7 git+https://github.com/vmware/vsphere-automation-sdk-python.git ; python_version >= '2.7' # Python 2.6 is not supported |
If you are wondering how to figure out what this should consist of, each of your collections should either specify which packages to install, or they should include a requirements.txt file directly(I just found the requirements file in the git repo and went from there).
Now it’s go time; I’m going to compile the EE:
1 2 3 4 5 6 | [root@aap vmware]# pwd /root/ee/vmware [root@aap vmware]# ansible-builder build --tag vmware_ee_supported Running command: podman build -f context/Containerfile -t ansible-execution-env:latest context Complete! The build context can be found at: /root/ee/vmware/context |
Notice that I added “–tag vmware_ee_supported” to the build command. This adds a unique name to the EE, otherwise it just shows up as “localhost/ansible-execution-env”…which isn’t that useful. In my vmware folder I now have a new folder structure/set of files(in a directory named context).
To view the new EE I’ll list my podman containers:
1 2 3 4 5 6 | [root@aap vmware]# podman image list REPOSITORY TAG IMAGE ID CREATED SIZE localhost/vmware_ee_supported latest 9b26f91c4487 42 hours ago 1.25 GB quay.io/ansible/ansible-runner latest 43736a7bc136 2 days ago 761 MB quay.io/ansible/ansible-builder latest 16689884a603 2 days ago 655 MB registry.redhat.io/ansible-automation-platform-21/ee-supported-rhel8 latest 6a3817e80b0c 2 days ago 1.13 GB |
I’ve now successfully built my EE, and I can use it in ansible-navigator, but right now I can’t use it in AAP…that is not until I push it to a container registry.
Pulling collections from private automation hub with self signed or corporate certs
So collections are pulled from inside of the EE container, which means if you want it to successfully authenticate either your self-signed cert or your corporate cert you have to install that thing inside of the container.
Since I’m using a private automation hub I have to tell ansible-builder how to authenticate to my PAH and which repositories to check…oh, and in what order. This is all done inside a custom ansible.cfg file. Mine is below:
1 2 3 4 5 6 7 8 9 10 | [galaxy] server_list = pah_com,pah_cert [galaxy_server.pah_com] url=https://pah.gregsowell.com/api/galaxy/content/community/ token=ac99d7018b93316725a71361341c9a81428868c4 [galaxy_server.pah_cert] url=https://pah.gregsowell.com/api/galaxy/content/rh-certified/ token=ac99d7018b93316725a71361341c9a81428868c4 |
As you can see at the top I have an ordered list(search in the first and move down until an entry is found) of my servers to search in the [galaxy] section.
Below that I have entries for each repo on URL to connect with and token to authenticate with. This info is found on your PAH here:
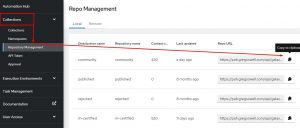
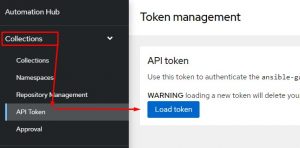
The execution-environment.yml file also needs to be modified to include the ansible.cfg file:
1 2 3 4 5 6 7 8 9 10 11 12 | --- version: 1.0.0 build_arg_defaults: EE_BASE_IMAGE: 'registry.redhat.io/ansible-automation-platform-21/ee-supported-rhel8' #EE_BASE_IMAGE: 'registry.redhat.io/ansible-automation-platform-20-early-access/ee-supported-rhel8:2.0.0' ansible_config: 'ansible.cfg' dependencies: galaxy: requirements.yml python: requirements.txt |
Now to actually move on to the certificates.
I started by just using the self-signed cert already on my private automation hub server. I looked in the “/etc/pulp/certs/” folder on PAH and grabbed both the pulp_webserver.crt and the root.crt files.
I then copied these files into the directory with my EE files.
Next, inside the EE folder I run “ansible-builder create” to create the container files for me(note I show the contents of my folder here and you can see the two .crt files):
1 2 3 4 5 6 7 8 9 10 11 12 13 14 15 16 17 18 19 20 21 22 23 | [root@aap aws_ee_supported]# pwd /root/ansible-execution-environments/aws_ee_supported [root@aap aws_ee_supported]# ls -l -rw-r--r-- 1 root root 404 May 26 14:16 ansible.cfg -rw-r--r-- 1 root root 598 May 27 15:30 execution-environment.yml -rw-r--r-- 1 root root 1935 May 27 12:31 pulp_webserver.crt -rw-r--r-- 1 root root 191 May 26 10:06 requirements.txt -rw-r--r-- 1 root root 214 May 27 15:23 requirements.yml -rw-r--r-- 1 root root 1899 May 27 12:35 root.crt [root@aap aws_ee_supported]# ansible-builder create File context/_build/requirements.yml had modifications and will be rewritten Complete! The build context can be found at: /root/ansible-execution-environments/aws_ee_supported/context [root@aap aws_ee_supported]# ls -l total 24 -rw-r--r-- 1 root root 404 May 26 14:16 ansible.cfg drwxr-xr-x 3 root root 41 May 27 15:35 context -rw-r--r-- 1 root root 598 May 27 15:30 execution-environment.yml -rw-r--r-- 1 root root 1935 May 27 12:31 pulp_webserver.crt -rw-r--r-- 1 root root 191 May 26 10:06 requirements.txt -rw-r--r-- 1 root root 214 May 27 15:23 requirements.yml -rw-r--r-- 1 root root 1899 May 27 12:35 root.crt |
I now need to copy those .crt files into the newly created ./context/_builder folder:
1 | cp *.crt ./context/_builder |
Now I need to modify the ./context/Containerfile file. This is a file that was created with the ansible-builder create command and it instructs podman how to build the container:
1 2 3 4 5 6 7 8 9 10 11 12 13 14 15 16 17 18 19 20 21 22 23 24 25 26 27 28 29 30 31 32 | ARG EE_BASE_IMAGE=registry.redhat.io/ansible-automation-platform-21/ee-supported-rhel8 ARG EE_BUILDER_IMAGE=registry.redhat.io/ansible-automation-platform-21/ansible-builder-rhel8:latest FROM $EE_BASE_IMAGE as galaxy ARG ANSIBLE_GALAXY_CLI_COLLECTION_OPTS= USER root ADD _build/ansible.cfg ~/.ansible.cfg ADD _build /build WORKDIR /build RUN cp *.crt /etc/pki/ca-trust/source/anchors && update-ca-trust RUN ansible-galaxy role install -r requirements.yml --roles-path /usr/share/ansible/roles RUN ansible-galaxy collection install $ANSIBLE_GALAXY_CLI_COLLECTION_OPTS -r requirements.yml --collections-path /usr/share/ansible/collections FROM $EE_BUILDER_IMAGE as builder COPY --from=galaxy /usr/share/ansible /usr/share/ansible ADD _build/requirements.txt requirements.txt RUN ansible-builder introspect --sanitize --user-pip=requirements.txt --write-bindep=/tmp/src/bindep.txt --write-pip=/tmp/src/requirements.txt RUN assemble FROM $EE_BASE_IMAGE USER root COPY --from=galaxy /usr/share/ansible /usr/share/ansible COPY --from=builder /output/ /output/ RUN /output/install-from-bindep && rm -rf /output/wheels |
The one line I added is on line 13 “RUN cp *.crt /etc/pki/ca-trust/source/anchors && update-ca-trust”.
What this does is instruct the container to copy an cert files from the _build folder and put them in the ca-trust anchors folder, then it runs the update-ca-trust command to load them in. Notice the placement of the command; I put it just before the roles/collections are to be installed. It needs to be in place BEFORE the collection install is attempted. Ansible-builder does have a prepend option to add commands, unfortunately it does NOT place these commands prior to collection installation, which means it can’t be used for cert install.
Again these are my self-signed certs, but they could also be the roots for your internal CA.
After this I only have to issue a single command to have it complete the build:
1 | podman build -f context/Containerfile -t aws_ee_supported context |
The -t option is what the EE will be named, so in my case it was aws_ee_supported.
The podman command should now correctly pull all of your collections and validate the certificates! Also, the automated EE build blog post I link to at the top has this functionality incorporated. It looks for the .crt files in the EE folder and if it finds them it automatically follows these steps!
Troubleshooting how to install stuff in your EE or what commands are needed. This is only needed if you are having issues installing dependencies or the like.
You can connect to an EE via podman with:
1 2 3 4 5 6 | [root@aap registries.conf.d]# podman image list REPOSITORY TAG IMAGE ID CREATED SIZE registry.redhat.io/ansible-automation-platform-21/ee-supported-rhel8 latest 81341f0c0f2d 4 weeks ago 1.18 GB [root@aap registries.conf.d]# podman run -it registry.redhat.io/ansible-automation-platform-21/ee-supported-rhel8 /bin/bash bash-4.4# |
In the above I used the container name, but you could also use the image ID. Now that I have a shell on the container I can test all of my commands.
If I want to test DNF installing I can use the microdnf command:
1 2 3 4 5 6 7 8 9 10 11 12 13 14 15 16 | bash-4.4# microdnf install unzip Downloading metadata... Package Repository Size Installing: unzip-6.0-45.el8_4.x86_64 ubi-8-baseos 199.9 kB Transaction Summary: Installing: 1 packages Reinstalling: 0 packages Upgrading: 0 packages Obsoleting: 0 packages Removing: 0 packages Downgrading: 0 packages Downloading packages... Running transaction test... Installing: unzip;6.0-45.el8_4;x86_64;ubi-8-baseos Complete. |
If you need to locate files you can try installing the find command with:
1 2 3 | microdnf install findutils find / -name *.jar |
Then if you want to test the “RUN” commands from the execution-environments.yml file you can just blast them here. Once you are done testing, you can just exit the container and all is right with the world. Remember that when you kill your connection to the container, the temporary one you just spun up disappears…like magic!
Installing Private Automation Hub
There are a lot of different container registries you can use; I mean even github has options. I’m going to use Red Hat’s Private Automation Hub(I’ll refer to it as PAH or pah moving forward) to host mine since it’s a great repository for collections anyway.
Installing it is pretty easy. All I really do is standup a RHEL8 box, edit the inventory file I installed my controller from, and fire off setup again.
Here’s the snippit from my inventory I configured for my PAH:
1 2 3 4 5 6 7 8 9 10 11 12 13 14 15 16 17 18 19 20 21 22 23 24 25 26 27 28 | [automationhub] pah.gregsowell.com ansible_user=Greg ansible_password=HeIsAwesome # Automation Hub Configuration # automationhub_admin_password='SoupIsntAMeal' automationhub_pg_host='' automationhub_pg_port='' automationhub_pg_database='automationhub' automationhub_pg_username='automationhub' automationhub_pg_password='SoupIsntAMeal' automationhub_pg_sslmode='prefer' # When using Single Sign-On, specify the main automation hub URL that # clients will connect to (e.g. https://<load balancer host>). # If not specified, the first node in the [automationhub] group will be used. # automationhub_main_url = 'https://pah.gregsowell.com' # By default if the automation hub package and its dependencies # are installed they won't get upgraded when running the installer # even if newer packages are available. One needs to run the ./setup.sh # script with the following set to True. # automationhub_upgrade = True |
A couple of notes about this are needed. First you will notice I put a username and password on the line of my pah server, because I wanted to be lazy and keep the connection simple. When you do this it will fail by default, because it doesn’t have the SSH key cached for this host. To fix this just SSH to the host on the CLI and accept the key…EZPZ.
You will also notice I put in a main URL, because it will yell at me if I don’t.
Last and pretty importantly is the fact that I set upgrade to true. By default it won’t do an upgrade on an existing PAH…I’m really not sure why. If you want to perform an upgrade if you have an older version, then set this to true.
You can now run the ./setup file in your install folder(I always go with bundled BTW), and Bob’s your uncle.
Pushing EEs To A Container Registry
This could be any CR, but in my case, it’s going to be my PAH.
Step one, connect podman to the CR:
1 | podman login pah.gregsowell.com --tls-verify=false |
I have tls-verify off because this is in my lab and it doesn’t have a valid cert on it.
Now that I’ve logged in I can push the EE up:
1 2 3 4 5 | [root@aap vmware]# podman image list REPOSITORY TAG IMAGE ID CREATED SIZE localhost/vmware_ee_supported latest 9b26f91c4487 42 hours ago 1.25 GB [root@aap vmware]# podman push localhost/vmware_ee_supported:latest docker://pah.gregsowell.com/vmware_ee_supported:1.0.0 --tls-verify=false |
You can see in the podman push command I specified a version number to assign to the EE when it hits the registry. If I update my EE I want to update the version number I push also.
Nooooooow I need to set AAP to pull the new EE.
Pull EE Into AAP
PAH Server
I’m going to pop into my PAH server and take a look at the container section:
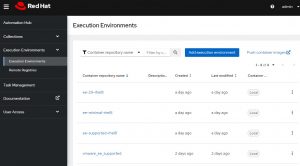
At the bottom I see my new EE “vmware_ee_supported”.
If I click on it, it will initially supply me with the pull instructions:
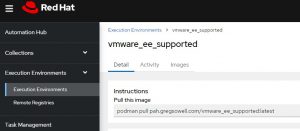
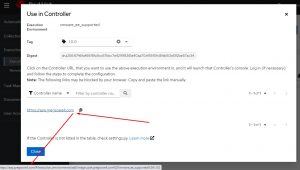
There’s also a helpful link to install it in the controller even quicker:

The screen it presents allows me to click the link for my controller and it will prepopulate it in AAP for me:
AAP Controller Server
I’m now going to jump into my AAP server and take a look at the configuration for the EE:
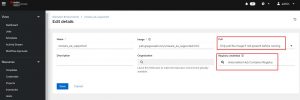
I’ve highlighted two things here.
First is the pull options. You can choose to: always pull before running, never pull before running, or pull if image not present. Pick whatever makes sense for you.
Second is the registry credentials. When you run the install script with a PAH specified, then a credential will automatically be added for you allowing you access to your PAH. By default it won’t be populated when initially adding a new EE to your controller. All you have to do is click the magnifying glass and add the “Automation Hub Container Registry” credential.
Conclusion
Now that it’s all done, it really isn’t that bad of a process. I’m assuming I’ll automate a chunk of this in the future, but for now, here’s the manual way. I plan to build my EEs off of the “supported” image to pack as much functionality into my EE as possible(again, I’m lazy). As things progress and change, I’ll try and revisit this document to keep it updated.
As always, if you have any questions/comments, please let me know.
Good luck and happy automating!


Hey Greg,
This and your other blogs are amazing.
When I log into my private hub; it states I have no controllers available and you to look into settings.py
How would I define my controller cluster there?
Thanks
@Robert. What you want to do is install the Controller and the Private Automation Hub from the same inventory script. When you do it will not only add your controllers into PAH, but will also setup a connection between your PAH and your Controller.
Ah, Thank you. That is what I was thinking but was unsure. A lot of documentation has them performed in separate steps and inventory files.
I am using AWS RDS for the databases (one for controller, one for pah). Would I list each in the [database] section?
Thank you
Awesome info! Thanks for putting it all together. This is exactly what I was looking for.
If you are sharing a DB you should have it listed in the inventory so they can both be configured to use it.
@Jason NP 🙂