First I have to say this wasn’t as simple and straight forward as I could have hoped for…in fact it took me the better part of 1.5 days to get working, and even then I had to get help from Jody Hunt from CyberArk(HUGE thanks to him). In fact, I partially followed his guide here to get started. I figure it took me enough work to get it stood up, so why not go ahead and write a playbook to do all of it for me…and now I’ve made it available to you!
Video Demonstration
Environment Building
To get the infrastructure up and working I followed the Conjur Opensouce guide here. This walks through most of the CLI commands required to get the containers up and working. If you wanted to do a manual deploy you can pretty much just follow along with copy/paste.
First step is to clone the conjur-quickstart repo. After that docker-compose is used to pull the various containers, generate a data key, load the key in as an environment variable, then start prepping the conjur environment.
Once this is complete the structure of the system is loaded in via a policy. A policy dictates what elements exist: hosts, users, variables(things that hold passwords and the like). They also determine what devices can access what things.
I created this simple flat policy that has two variables, one named password and one named ansible(I’m loading it in as a jinja template, though I’m not changing anything at the moment):
Looking at the network.yml file that is created you can see where I setup my variables at the top, then I specify a host(it will be my tower server, so I named it tower), and the last is permitting tower to read/execute the above variables. When I load this policy in, it will generate the API key that the tower user will use, so I pipe this to a file for easy reference later.
After I load that in I store a secret for the variables:
docker-compose exec client conjur variable values add password redhat
docker-compose exec client conjur variable values add ansible redhat
Deployment From Ansible
Here is the playbook for full deployment:
I’ll break this down a little at a time.
In the vars section at the top I’m specifying which folder the cloned quickstart repo will go in. This is also where all of the key files will be stored.
Next I set what the passwords for my “password” and “ansible” variables will be(I set them to redhat by default).
One of the quirks of connecting conjur to tower is that it requires the host name of “proxy” to be defined in tower’s host file(the name “proxy” is what tower uses to connect later on in the credential section). So the first task adds an entry to tower’s hosts file with the IP of the ca-conjur host.
I next create the storage directory, and then install some yum utilities and add the docker repo.
Next the yum module is used to install docker and git.
Since this is a lab server I kill the linux firewall, then crank on docker.
I now grab the docker compose binary and set it to executable. Docker compose is what’s used hence forth to interact with the containers.
After that a simple git clone is done on the quickstart repo.
Following up begins all of the docker-compose commands. These commands will eventually create four files in the quickstart folder: data_key, admin_data, tower_data, and tower_pki_cert.
The data_key file will store the key used to connect to the myConjurAccount(the account I create everything in).
admin_data holds the key for the admin account.
tower_data holds the API key for the tower host that’s used to connect to conjur from tower.
tower_pki_cert contains the cert that is used to connect to conjur from tower.
At the end of the script it spits out almost all of the info required to create the custom cert(the only thing not displayed is the cert because formatting gets messed up).
This is an example of the final output:
TASK [print out user info] *****************************************************
ok: [ca-conjur] => {
    "msg": [
        {
            "Conjur URL": "https://proxy:8443"
        },
        "API Key:       \"api_key\": \"2kdm28c37ebx1akqtxzynheecjt9zk4ydwt0jb14hm91d2gtqpq2\"",
        {
            "Account": "myConjurAccount"
        },
        {
            "Username": "host/tower"
        },
        "Public Key Cert: in file at /opt/conjur-repo/tower_pki_cert.  I couldn't get formatting to look right for copy paste, so grab from file."
    ]
}
Conjur Credential In Tower
So taking the final output from the script above I’ll fill in the proper details on tower:
TASK [print out user info] *****************************************************
ok: [ca-conjur] => {
    "msg": [
        {
            "Conjur URL": "https://proxy:8443"
        },
        "API Key:       \"api_key\": \"2kdm28c37ebx1akqtxzynheecjt9zk4ydwt0jb14hm91d2gtqpq2\"",
        {
            "Account": "myConjurAccount"
        },
        {
            "Username": "host/tower"
        },
        "Public Key Cert: in file at /opt/conjur-repo/tower_pki_cert.  I couldn't get formatting to look right for copy paste, so grab from file."
    ]
}
Here’s the screenshot of cating the tower_pki_cert file and applying all of the info to my tower:
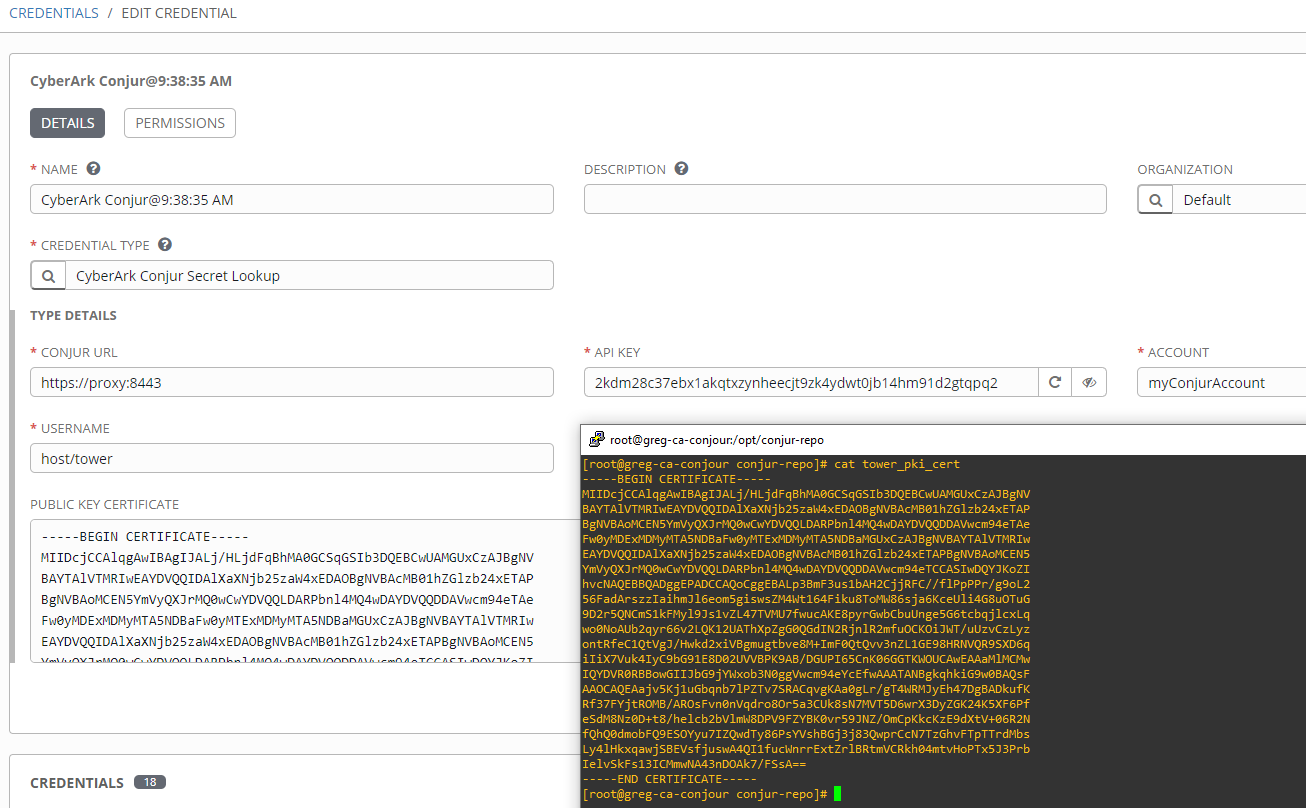
**notice that in the above host API key that the last \ isn’t part of the key**
With all of that info in place, click the test button and try the password or ansible variable:

Now to utilize this credential as a machine cred, create a standard machine cred, but click the magnifying glass on password:
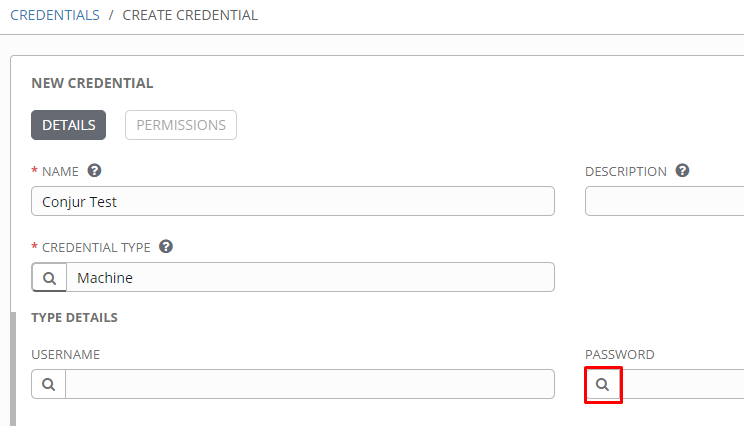
Now I choose the Conjur credential I just created:

Once I click “Next” I can put in the variable path; in this case it would be password or ansible:

Troubleshooting
You can log into the conjur client from the CLI using the following:
docker-compose exec client conjur authn login -u admin -p fvdkz72tjb7pd3twtv731csqd1523bxezg7vvn72g3qf7r29zpwytYou can find the password in the above by catting the admin_data file and looking for the “API key for admin” section:
[root@greg-ca-conjour conjur-repo]# cat admin_data
Created new account 'myConjurAccount'
Token-Signing Public Key: -----BEGIN PUBLIC KEY-----
MIIBIjANBgkqhkiG9w0BAQEFAAOCAQ8AMIIBCgKCAQEAyNnZc4T17gatYNfWwByu
OwpsgeI1Nc/NuUbcVS88R2e0VsI0EM6A8yN0/e0y9PxppbNnKRN3E7OEo7MWw6oI
WBWzDJtfexDXPVJLYfbJ0iwjXESRevaORyA58Lh9LOtp2ByUpQqEViGp0mxdDNJb
92ZdyCWhzAtMKhsqjQ38ZCIap0SCPSyZgZRTzh1cWeZaLpKGDXWy8cHEmeGHGeyQ
8yMtITUkzP2SFLuJQjahWlI/WlL8+Lm1yV5NZFv8WN0KhwCRB332RMVyJzaTwdqa
xMxlmYUbqVaGO4Lq2LatOyGGGmIzfKV6HS+0ynDm8w4p8yeoTvOu9Y4kq43jMcPo
+wIDAQAB
-----END PUBLIC KEY-----
API key for admin: 1wx2sj11a5wv821t62p133mw11xj1gm27011gjmtpp1dhcdqv2pk3617
Once logged in I can view the configured infrastructure with the conjur list command:
[root@greg-ca-conjour conjur-repo]# docker-compose exec client conjur list
[
  "myConjurAccount:policy:root",
  "myConjurAccount:variable:password",
  "myConjurAccount:variable:ansible",
  "myConjurAccount:host:tower"
]
^^ In the above myConfurAccount is the system account. You can also see the variables in the system along with their location structure. I also see my configured hosts.
Now that I see my variables listed I can view their contents like so:
[root@greg-ca-conjour conjur-repo]# docker-compose exec client conjur variable value password
redhat
If I want to check out what my docker containers are doing I can issue the following:
[root@greg-ca-conjour conjur-repo]# docker ps
CONTAINER ID        IMAGE                            COMMAND                  CREATED             STATUS              PORTS                           NAMES
0fcd7aab279f        cyberark/conjur-cli:5            "sleep infinity"         19 hours ago        Up 19 hours                                         conjur_client
c212738f44da        nginx:1.13.6-alpine              "nginx -g 'daemon of…"   19 hours ago        Up 19 hours         80/tcp, 0.0.0.0:8443->443/tcp   nginx_proxy
686336d019ec        cyberark/conjur                  "conjurctl server"       19 hours ago        Up 19 hours         80/tcp                          conjur_server
096ace7521c8        cfmanteiga/alpine-bash-curl-jq   "tail -F anything"       19 hours ago        Up 19 hours                                         bot_app
7b41709e8a27        postgres:10.14                   "docker-entrypoint.s…"   19 hours ago        Up 19 hours         5432/tcp                        postgres_database
The above command will list the various containers and their current states.
I can view their log files by issuing a docker logs command along with the container ID form the ps command:
[root@greg-ca-conjour conjur-repo]# docker logs c212738f44da
10.1.12.10 - - [03/Nov/2020:21:11:48 +0000] "POST /authn/myConjurAccount/host%2Ftower/authenticate HTTP/1.1" 200 632 "-" "python-requests/2.23.0"
10.1.12.10 - - [03/Nov/2020:21:11:48 +0000] "GET /secrets/myConjurAccount/variable/password HTTP/1.1" 200 16 "-" "python-requests/2.23.0"
10.1.12.10 - - [04/Nov/2020:14:46:04 +0000] "POST /authn/myConjurAccount/host%2Ftower/authenticate HTTP/1.1" 200 632 "-" "python-requests/2.23.0"
10.1.12.10 - - [04/Nov/2020:14:46:04 +0000] "GET /secrets/myConjurAccount/variable/password HTTP/1.1" 200 16 "-" "python-requests/2.23.0"
You can also follow the logs while you are testing with -f:
[root@greg-ca-conjour conjur-repo]# docker logs c212738f44da -f
10.1.12.10 - - [03/Nov/2020:21:11:48 +0000] "POST /authn/myConjurAccount/host%2Ftower/authenticate HTTP/1.1" 200 632 "-" "python-requests/2.23.0"
10.1.12.10 - - [03/Nov/2020:21:11:48 +0000] "GET /secrets/myConjurAccount/variable/password HTTP/1.1" 200 16 "-" "python-requests/2.23.0"
10.1.12.10 - - [04/Nov/2020:14:46:04 +0000] "POST /authn/myConjurAccount/host%2Ftower/authenticate HTTP/1.1" 200 632 "-" "python-requests/2.23.0"
10.1.12.10 - - [04/Nov/2020:14:46:04 +0000] "GET /secrets/myConjurAccount/variable/password HTTP/1.1" 200 16 "-" "python-requests/2.23.0"
Conclusion
So enterprise Conjur would be MUCH simpler to deal with since it has a GUI that walks you simply through all of these steps. I’d honestly like to give the enterprise edition a test drive just to see the differences, but for now, the system is done.
Let me know your questions and comments, and as always, happy automating!
Leave a Reply