

Cisco Call Manager Express/Communications Manager Express, Cheap FXS/FXO Ports, and Asterisk Voicemail
Here’s the scenario. I’ve got a charter school that has an aaaaaaancient PBX kicking a PRI. Having the system updated is expensive and the PRI is even more expensive. We are going to roll a new PBX for them in about 8 months, and their PRI’s contract is coming up soon. This is a perfect time to switch them to a SIP trunk and put in a temporary PBX for them.
I’m using my lab 2621XM running CME4.1 as their temp PBX. We are loaning them some 7912s that we had sitting on the shelf. Beyond that they needed some analog lines.
Analog lines come in two flavors, FXO and FXS. FXO ports would be the ports you use to terminate a standard phone line from the telco. This would be what you would use to terminate regular pots line you get from the phone company. FXS ports are the interfaces you would terminate an analog phone or fax on. In our case we have fax/stamp machines to terminate so we needed 5 analog FXS ports.
You can get standard ata 186s, but they retail for around $120 even on ebay. These will get you two FXS ports. 3 of these would cost us over $400! This is a little much to stomach…really just because I’m so cheap. I happen to have a secret weapon…the Cisco MC3810!
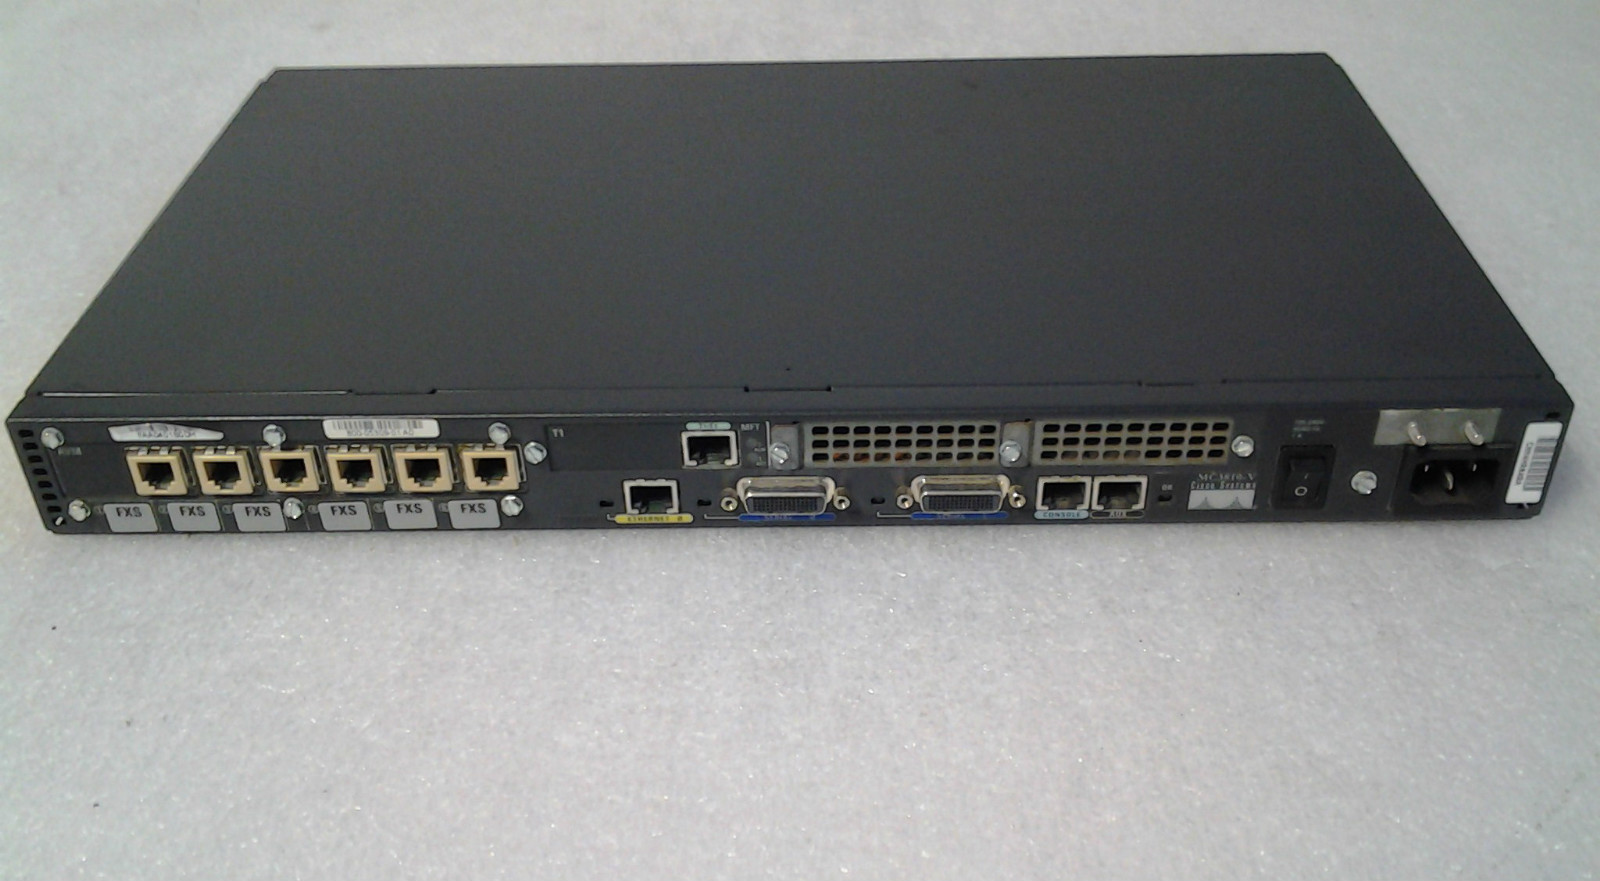
These little beauties are ancient, but can be hand for a song on ebay or via your favorite distributor. They support up to 6 analog ports and can be any combination of FXS, FXO, or EMI ports. They will often come with a T1 interface also! You will want to get a “show ver” off of the unit prior to ordering it just to verify which analog ports are installed.
MC3810 SCB board (v04.K0) 1 Multiflex T1(slot 3) RJ45 interface(v03.A0) 1 Six-Slot Analog Voice Module (v03.K0) 1 Analog FXS voice interface (v03.K0) port 1/1 1 Analog FXS voice interface (v03.K0) port 1/2 1 Analog FXS voice interface (v03.K0) port 1/3 1 Analog FXS voice interface (v03.K0) port 1/4 1 Analog FXS voice interface (v03.K0) port 1/5 1 Analog FXO voice interface (v03.K0) port 1/6 |
The only down side to using the MC3810 is that call routing will need to be manually done…which isn’t too huge an issue really. For the cost savings it is worth spending another 30 minutes on configuration, right?
Last, I don’t have Unity Express(CUE), so I decided to use Asterisk as a voicemail server. There are some links that show how to properly use asterisk as a VM server, but I’m doing it my own way…would you expect anything less? I’m using elastix as my asterisk install. It is basically centos on an installable disk that once inserted will format the hard drive, install centos, and last install all necessary packages. This makes going zero to VOIP pretty easy.
Some would argue that you can just flash the phones SIP and use them on the elastix install. I have done this before, but going back to skinny is a pain in the butt…as is getting tftp and the like installed and working. It is much easier to just use CME as the PBX…plus it is more fun 😉
CME Config
We are starting from a clean config, so the easiest thing to do is use setup :P:
1 2 3 4 | Greg-CME(config)#telephony-service setup --- Cisco IOS Telephony Services Setup --- |
This gives you an interactive prompt response to quickly setup some basic facilitites.
1 2 3 4 5 6 7 8 9 10 11 12 13 14 15 16 17 18 19 20 21 22 23 24 25 26 27 28 29 30 31 32 33 34 35 36 37 38 39 40 41 42 43 44 45 46 47 48 49 50 51 52 53 54 55 56 57 | Do you want to setup DHCP service for your IP Phones? [yes/no]: yes
Configuring DHCP Pool for Cisco IOS Telephony Services :
IP network for telephony-service DHCP Pool:172.31.255.0
Subnet mask for DHCP network :255.255.255.0
TFTP Server IP address (Option 150) :172.31.255.1
Default Router for DHCP Pool :172.31.255.1
Do you want to start telephony-service setup? [yes/no]: yes
Configuring Cisco IOS Telephony Services :
Enter the IP source address for Cisco IOS Telephony Services :172.31.255.1
Enter the Skinny Port for Cisco IOS Telephony Services : [2000]:
How many IP phones do you want to configure : [0]: 20
Do you want dual-line extensions assigned to phones? [yes/no]: yes
What Language do you want on IP phones :
0 English
1 French
2 German
3 Russian
4 Spanish
5 Italian
6 Dutch
7 Norwegian
8 Portuguese
9 Danish
10 Swedish
11 Japanese
[0]:
Which Call Progress tone set do you want on IP phones :
0 United States
1 France
2 Germany
3 Russia
4 Spain
5 Italy
6 Netherlands
7 Norway
8 Portugal
9 UK
10 Denmark
11 Switzerland
12 Sweden
13 Austria
14 Canada
15 Japan
[0]:
What is the first extension number you want to configure : 8956
Do you have Direct-Inward-Dial service for all your phones? [yes/no]: no
Do you want to forward calls to a voice message service? [yes/no]: no
Do you wish to change any of the above information? [yes/no]: no
CNF-FILES: Clock is not set or synchronized, retaining old versionStamps
---- Setup completed config --- |
If you tell it you have 10 phones it will start with the “first extension” and create sequential extensions.
This only gives you some basic functionality. Lets add some additional config:
I’m adding some exclusions to my DHCP. .2 will be our VM server and .3 will be our MC3810.
1 | ip dhcp excluded-address 172.31.255.2 172.31.255.10 |
Setup an ethernet interface to connect the router to the phone network.
1 2 3 4 5 6 | interface FastEthernet0/1 description [phone network] ip address 172.31.255.1 255.255.255.0 duplex auto speed auto no shut |
Setup the web interface to our CME.
1 2 | telephony-service web admin system name ccmadministrator password cisco |
Configure the SIP trunks over to our MC3810. We have 5 analog lines configured with 5 different extensions. Our extensions will be 8949 and 8950 through 8953.
1 2 3 4 5 6 7 8 9 10 11 12 13 14 15 16 17 18 19 | dial-peer voice 10 voip !we start with our dial peer description sip-trunk-mc3810 !give it a friendly name destination-pattern 8949 !if this pattern is dialed exactly it will match. session protocol sipv2 !setting the trunking protocol to SIP session target ipv4:172.31.255.3 !this sets the target to the IP address of our MC3810 session transport udp !we are explicitly setting transport to use UDP dtmf-relay rtp-nte sip-notify codec g711alaw !explicitly setting the codec for the trunk no vad !this kills voice activity detection ! dial-peer voice 11 voip description sip-trunk-mc3810 destination-pattern 895[0-3] !this matches any extension of 8950 through 8953 session protocol sipv2 session target ipv4:172.31.255.3 session transport udp dtmf-relay rtp-nte sip-notify codec g711alaw no vad |
The destination pattern matching can be a bit tricky. Here’s a friendly chart that explains the whole mess.
Here’s our SIP trunk to the VM server.
1 2 3 4 5 6 7 8 9 | dial-peer voice 7000 voip description sip-trunk-VM destination-pattern 7... !any of our VM accounts are in the 7000 - 7999 range. Thus we route all of this to the VM server. session protocol sipv2 session target ipv4:172.31.255.2 session transport udp dtmf-relay rtp-nte sip-notify codec g711alaw no vad |
We also need to configure our voice translation rules. These take either a called or calling number and translate it to something else. We are going to use this to translate the 10 digit dialed number someone calls from the outside to our 4 digit extensions.
This first rule will be used when someone calls in to us. It takes the 10 digit dialed number and drops the first 7 digits and appends an 8 to the front.
1 2 | voice translation-rule 1 rule 1 /5551234/ /8/ |
You can test with the following:
1 2 3 | Greg-CME#test voice translation-rule 1 5551234123 Matched with rule 1 Original number: 5551234123 Translated number: 8123 |
This will be used for outgoing calls. It will drop the 8 from the beginning of the extension and prepend the rest of our 10 digit number.
We will assign this to our phone provider. In our case this will come from a SIP provider, but this could also be assigned to a PRI interface.
1 2 | voice translation-rule 10 rule 1 /^8\(...\)/ /5551234\1/ |
Since we will be using 9 to dial an outside line, it will take the 9 and drop it leaving only the remaining dialed digits.
1 2 | voice translation-rule 20 rule 1 /^9\(.+\)/ /\1/ |
Now we assign the above rules to translation profiles.
1 2 3 4 5 6 | voice translation-profile provider-in !this will be incoming from our SIP provider translate called 1 !this manipulates the number someone out in the telecom world called...one of our DIDs. ! voice translation-profile provider-out !this will be use heading out this provider translate calling 10 !this changes the extension from 8XXX to a 10 digit number translate called 20 !this drops the 9 dialed before the number and sends it on |
Now lets create our provider SIP trunk and add our translations:
1 2 3 4 5 6 7 8 9 10 11 | dial-peer voice 9999 voip description sip-trunk-provider translation-profile incoming provider-in !applying incoming translations translation-profile outgoing provider-out !applying outgoing translations destination-pattern 9.+ !match anything that starts with a 9 session protocol sipv2 session target ipv4:1.1.1.1 session transport udp dtmf-relay rtp-nte sip-notify codec g711alaw no vad |
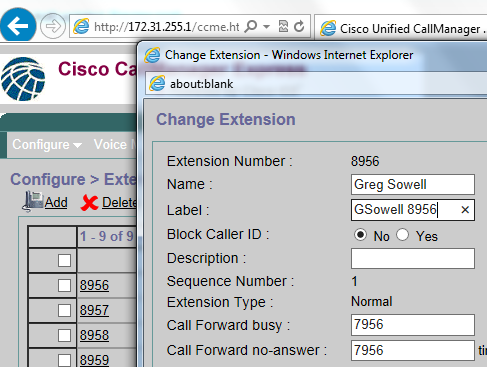
At this point you can log into CME’s web interface to customize your extension(adding descriptions and the like). We will want to set the “call forward busy” and the “call forward no answer” to the extension’s specific VM account.
MC3810 Config
Get some of the basics out of the way…
1 2 3 4 | hostname mc3810 interface Ethernet0 ip address 172.31.255.3 255.255.255.0 ip route 0.0.0.0 0.0.0.0 172.31.255.1 |
Voice ports represent the physical ports. Here we just put descriptions.
1 2 3 4 5 6 7 8 9 10 11 12 13 14 | voice-port 1/1 description [Downstairs Fax/mail meter] ! voice-port 1/2 description [Upstairs Fax] ! voice-port 1/3 description [Stamp1] ! voice-port 1/4 description [Stamp2] ! voice-port 1/5 description [Batphone] |
To assign an extension to the phone you just create a dial-peer that has an exact match to the extension, then send it out the proper port.
1 2 3 4 5 6 7 8 9 10 11 12 13 14 15 16 17 18 19 | dial-peer voice 8949 pots destination-pattern 8949 port 1/1 ! dial-peer voice 8950 pots destination-pattern 8950 port 1/2 ! dial-peer voice 8951 pots destination-pattern 8951 port 1/3 ! dial-peer voice 8952 pots destination-pattern 8952 port 1/4 ! dial-peer voice 8953 pots destination-pattern 8953 port 1/5 |
At this point we can plug a standard analog phones into the various ports and dial each other…pretty easy, eh.
The following dial peers send any calls that don’t live off of the analog ports out to our CME.
1 2 3 4 5 6 7 8 9 10 11 12 13 14 15 16 17 18 19 20 21 22 23 24 25 26 27 28 29 30 31 32 33 34 35 36 37 38 39 40 41 | dial-peer voice 10 voip destination-pattern .......+ !if you are dialing 7 digits or more send it to CME session protocol sipv2 session target ipv4:172.31.255.1 codec g711alaw no vad ! dial-peer voice 11 voip destination-pattern [1-7]... !extensions 1000 to 7999 go to CME session protocol sipv2 session target ipv4:172.31.255.1 codec g711alaw no vad !the following are very nit picky patterns to work around our extension scheme. dial-peer voice 12 voip destination-pattern 8[0-8].. session protocol sipv2 session target ipv4:172.31.255.1 codec g711alaw no vad ! dial-peer voice 13 voip destination-pattern 89[0-3,6-9]. session protocol sipv2 session target ipv4:172.31.255.1 codec g711alaw no vad ! dial-peer voice 14 voip destination-pattern 894[0-8] session protocol sipv2 session target ipv4:172.31.255.1 codec g711alaw no vad ! dial-peer voice 15 voip destination-pattern 895[5-9] session protocol sipv2 session target ipv4:172.31.255.1 codec g711alaw no vad |
Elastix Config
So lately I’ve been using Elastix because it is so simple…and I’m so lazy. It has the standard freepbx interface that you are accustomed to.
First go to PBX, trunk, and add a standard SIP trunk:
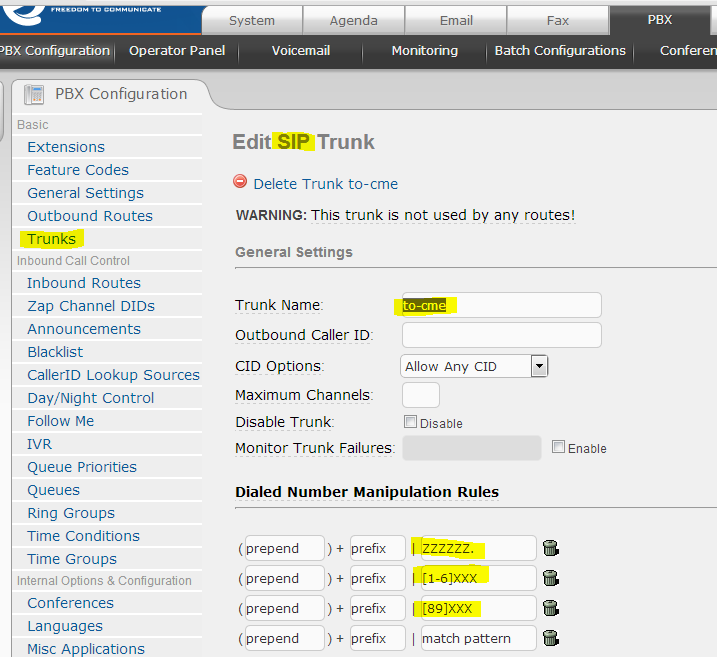
Give it a name “to-cme”. I then give it three dialing rules. Basically anything that is 7 digits or more, or any 4 digit extension that isn’t in the 7000 range.
Scroll down to the Outgoing settings section:
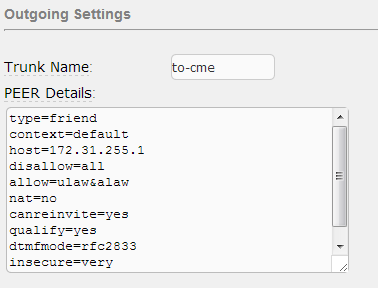
Add the following peer information:
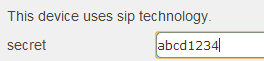
1 2 3 4 5 6 7 8 9 10 | type=friend context=default host=172.31.255.1 disallow=all allow=ulaw&alaw nat=no canreinvite=yes qualify=yes dtmfmode=rfc2833 insecure=very |
The host should be the IP address of your CME.
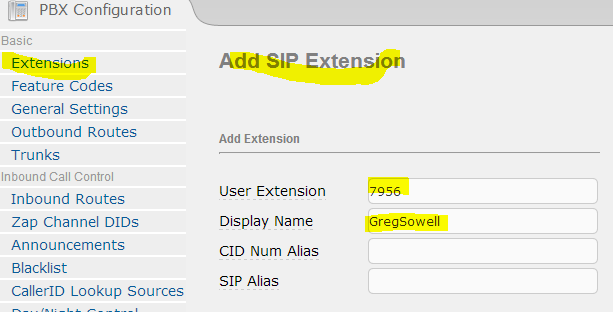
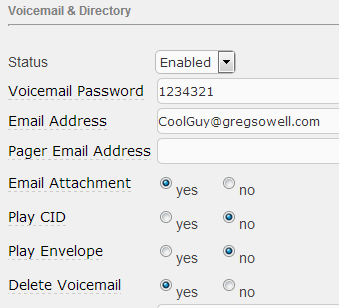
Now setup the voicemail accounts for your accounts. If our extension is 8956, then our voicemail account will be 7956. Create a standard SIP device and have its voicemail dump to the clients email.
I’ve no doubt there are far better ways to do this…and I’m sure more efficient methods using the same equipment, but it works and I had fun doing it. 🙂 Go VOIP and prosper my friends…;)