

When trying to hit the Rest API in a Yealink phone I was getting the following from cURL:
1 | curl: (60) SSL certificate problem: EE certificate key too weak |
Turns out this is a good thing as it is the system killing old ciphers. To get Centos8 to accept legacy protocols it’s a simple command and a reboot:
1 2 3 4 | $ update-crypto-policies --show DEFAULT # update-crypto-policies --set LEGACY Setting system policy to LEGACY |
After this you can reboot, then the old API is all yours 🙂 Obviously this isn’t ideal behavior, but for the sake of my testing it did the trick.

It’s no secret that I’m a Cisco fanboy. I started networking on Cisco kit and honestly got all of my foundations from studying for Cisco certs. So it should come as no surprise that I like finding excuses to automate Cisco in interesting ways.
This was my first experience with automating Cisco ACI(Application Centric Infrastructure) SDN controller. In essence they are trying to make a product that can discover your infrastructure(switches) as you connect them to the network, and auto configure the underlay/overlay networks. I have to admit, it does take a lot of the complicated parts out of the equation as it takes care of configuring IS-IS and the VXLAN connectivity.
I’ll be the first to admit that I have limited experience with the product, so if you use it on a regular basis, please contact me so I can make these demos more meaningful(make it do some much cooler stuff). I’m going to use Ansible as the conductor and ACI will be my brass section. Ansible is the center of the universe orchestrating my IT symphony.
Here’s a video overview(quick demo):
First things first; connect to Cisco’s developer site and browse their sandbox section.
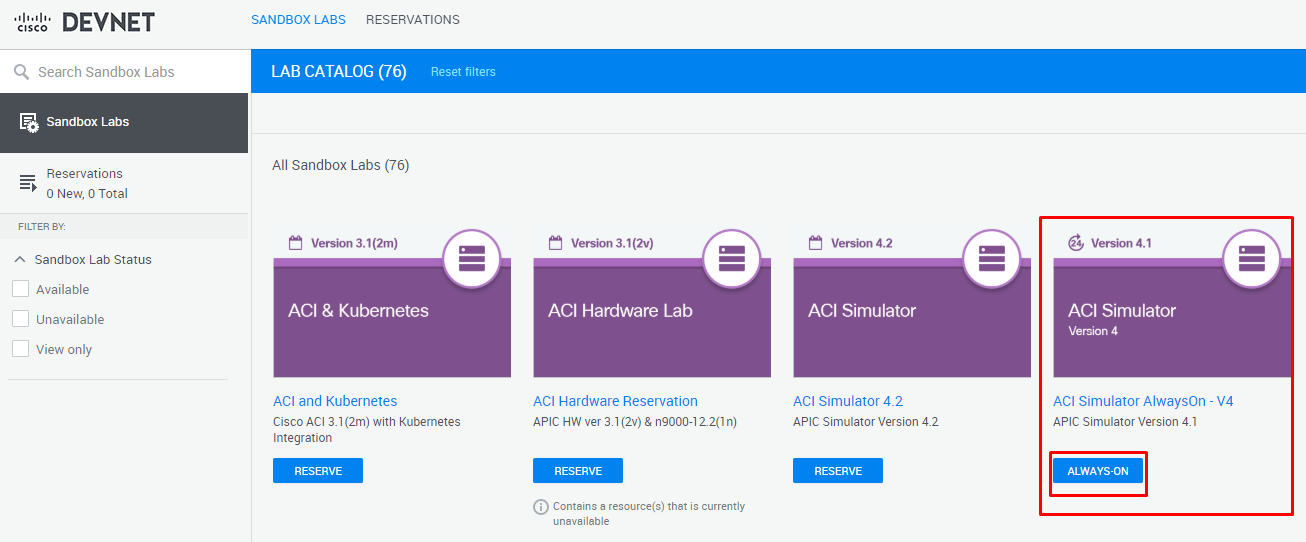
Here you can reserve an ACI server or do like me and just go with the “always on” box. They will supply you with a URL and some credentials to connect with.

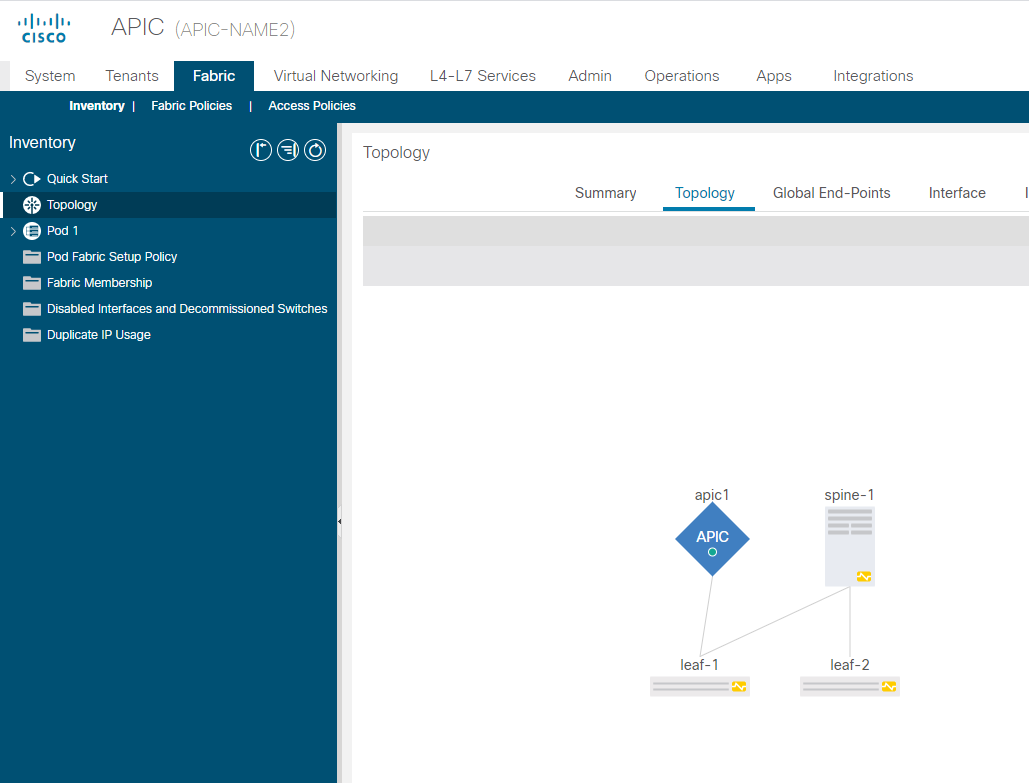
Keep in mind these are development environments, so they run a little slow(especially the always-on box). They have one spine and two leaf switches connect with a few basic configurations already in place. Be a good steward of the shared environment and only delete what you create(and don’t go too bananas at creation as there are limited resources).
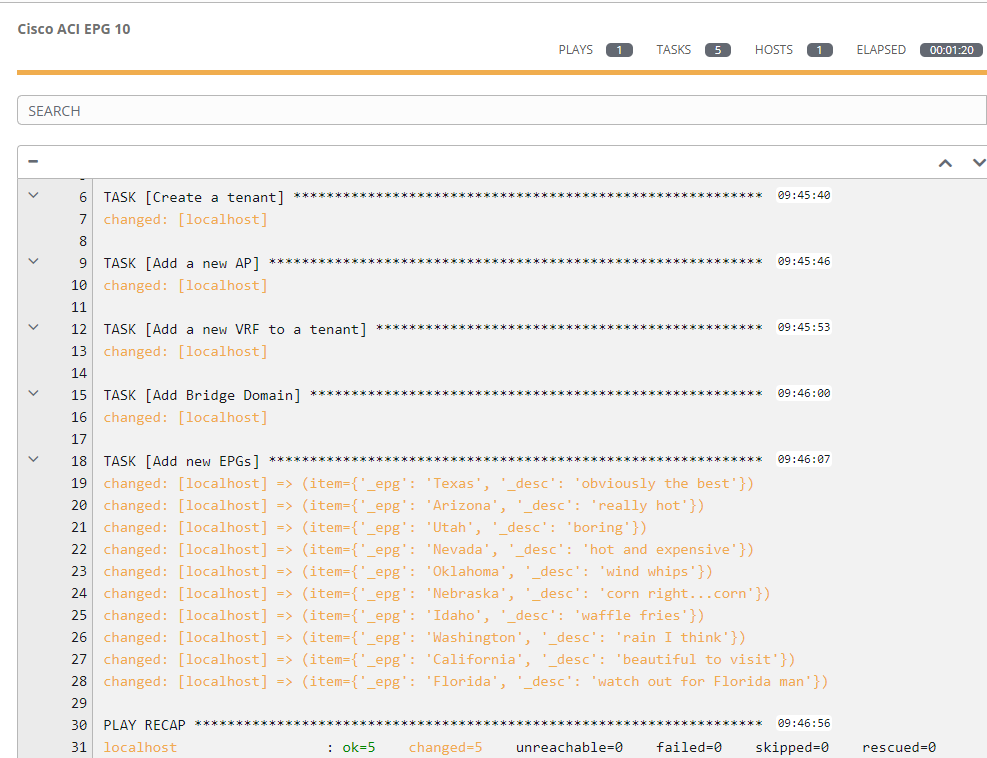
So my automation will connect in, create a tenant, create an application profile, create a VRF, add a bridge domain, then last it will create 10 EPGs. It’s going to do all of that in about one minute…bonkers, right?
I’ll start by showing the playbook(which can be found here), and while I have this as a single playbook, this could easily be broken down into multiple task files or roles. I do use a lot of variables for easy replacement/flexibility.
First I’ll look at the vars section. The aci_host, username, and password I just keep in a custom credential in Ansible Tower, so it keeps it secure and make it convenient to use. I talked about creating custom creds in this article.
Here I’m also specifying the tenant, app, bridge domain, and VRF info. After that I have a list of EPGs along with their descriptions. For the sake of keeping it all in one file I did it like this, but in production I would have this in some other form(at a minimum an external YAML file that will be referenced at run time).
Looking at the first task you can see just how simple all of this is. All of the ACI modules for Ansible(which there are a lot of) require host(IP/DNS name of ACI box), username, and password. All of which I variablized. The tenant is then specified, the state is set to present, I ignore invalid certs, and Bob’s your uncle. It’s just that simple.
This is my run output:
This is what the ACI server shows once complete:

These modules are also idempotent, which means I can rerun the exact same command and instead of showing changed, they just show OK, which means nothing needed to be done:

Manipulation of ACI with Ansible is almost too easy; how would you use this functionality? What orchestrations or events would you have take advantage of this functionality?

This week we have Greg, Mike, Wilson, and Tom Smyth; our rebel brother has returned for the holidays and he’s back to his old shenanigans.
**Sponsors**
Sonar.software
Cambium ePMP Bundle
**/Sponsors**
This week we talk about:
Irish politics
Covid for the Irish – the pubs are still closed!
Are people equipped to work from home
Fresh out of college, how do I get an IT job right now; what will I be missing out on being remote
Learning how to troubleshoot and experience
Automated network troubleshooting with zabbix/ansible
Ansible Omnibus – Things I learned along the way
Zach Biles blog – tips on ansible as he learns
What is a compelling automation story?
Here’s the video:(if you don’t see it, hit refresh)
When the dude discovers devices it will by default name them as just the IP address of the device; not always overly useful. If you have SNMP enabled on the devices you can use the OID for “system identity” to show up as the device name.
First select all of your devices, then right click on one and choose appearance:
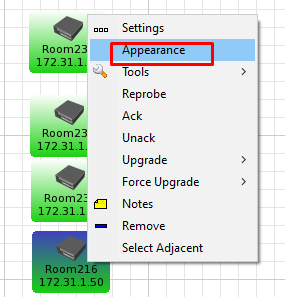
Next paste in the following to the label:

1 2 | [oid("iso.org.dod.internet.mgmt.mib-2.system.sysName.0")]
[Device.Name] |
Good luck and happy monitoring.

The great sales leader Tony Owens once said “Steal the wheel, don’t reinvent it.” With that in mind, here’s my github repo; feel free to grab and modify when/where you can.
I plan to revisit and update this article on a semi regular basis to keep adding new content, so keep checking back.
Also I welcome any and all feedback.
Variables
Saving task output to variable
This is done by registering the output to a variable. As you can see in the below you simply issue a call to a module and use the register keyword along with the variable name you want the output saved to.
1 2 3 4 5 6 7 8 9 10 | ---
- name: Register variables
hosts: localhost
tasks:
- name: get system time
shell: clock
register: sys_clock
- debug:
var: sys_clock |
The playbook output looks like this:
1 2 3 4 5 6 7 8 9 10 11 12 13 14 15 16 17 | ok: [localhost] => {
"sys_clock": {
"changed": true,
"cmd": "clock",
"delta": "0:00:00.202137",
"end": "2020-09-23 10:41:50.977857",
"failed": false,
"rc": 0,
"start": "2020-09-23 10:41:50.775720",
"stderr": "",
"stderr_lines": [],
"stdout": "2020-09-23 10:41:50.805184-05:00",
"stdout_lines": [
"2020-09-23 10:41:50.805184-05:00"
]
}
} |
Note all of the things returned on a registered variable…it’s not simply the results of the run.
If there was an error detected then stderr and stderr_lines would have values, but since this completed correctly, they are empty.
My out put is in stdout and stdout_lines. Lines will have the information formatted into consecutive lines whenever it detects a new line or line break. Stdout will just be all of the things smashed together.
rc stands for return code, which some commands will utilize(though not all do).
If I wanted to print just stdout I could do it like this:
1 2 3 | - name: print stdout
debug:
msg: "{{ sys_clock.stdout }}" |
Note how I referenced the variable: variablename (dot) variable.
I can also reference the exact same variable with slightly different syntax:
1 2 3 | - name: print stdout
debug:
msg: "{{ sys_clock['stdout'] }}" |
They both produce the same output:
1 2 3 | TASK [print stdout] ************************************************************************************************************************
ok: [localhost] => {
"msg": "2020-09-23 10:51:04.258207-05:00" |
Setting variables in a playbook
This is easily done via the set_facts module. In essence it says “set this variable to this”. Also notice that in the example I’m pulling something from the hostvars. This is the gathered_facts info and in this instance the current host should have a “color” field.
1 2 3 4 5 6 7 8 9 10 11 | - name: Set variables
hosts: localhost
tasks:
- name: set facts, yo
set_facts:
cust_desc: Bob's Burgers
cust_int: gi0/1
cust_color: "{{ hostvars[host]['color'] }}"
- debug:
msg: "{{cust_desc}},{{cust_int}},{{cust_color}}" |
Prompting for variables
A playbook can prompt the user at runtime for them to input data. I don’t use engine itself very often(in tower these prompts can be done with the “survey” option via the GUI).
1 2 3 4 5 6 7 8 9 10 11 12 13 14 15 16 17 | - name: Prompt for variables
hosts: localhost
vars_prompt:
- name: cust_desc
prompt: "what is the customer description?"
private: no
- name: cust_int
prompt: "what is the customer interface?"
private: no
- name: cust_color
prompt: "what is the customer color?"
private: no
- debug:
msg: "{{cust_desc}},{{cust_int}},{{cust_color}}" |
Loops
Loops give you the ability to iterate through a list which makes task completion much more efficient(or can at any rate).
In this example I use the yum module with a list, to install/update packages on a RHEL based device. Notice the variable “{{ item }}” here. By default when you define a loop, the product of that loop is referred to as item in variable form. This means at first iteration item will equal httpd, then at the next iteration it will equal dovecot.
1 2 3 4 5 6 | - yum:
name: "{{ item }}"
state: latest
loop:
- httpd
- dovecot |
Have a look here at version two of the above loop. This is what you are more likely to encounter when working with other modules to gather information. The variable mail_services is a list(which equates to an array). Here I specify the loop should use mail_services and iterate through each member.
1 2 3 4 5 6 7 8 9 10 | vars:
mail_services:
- httpd
- dovecot
tasks:
- yum:
name: "{{ item }}"
state: latest
loop: "{{ mail_services }}" |
Efficiency Note
Looping in modules isn’t always the most efficient way of processing information, though. The yum module allows you to specify multiple services in the form of a list like this:
1 2 3 4 5 | - yum:
name:
- httpd
- dovecot
state: latest |
The difference seems subtle, does it not? When you perform a loop it has to recall the module for each item in the array, which can take quite a while. When you just specify all of the modules in the name section(which can just be an list variable), it processes that block of code at once, making it much more efficient. Having said all of this, not every module allows you to specify multiple items like this, so sometimes a loop is the only option; be sure to check the documentation to see what options are available to you.
Looping through lists of dictionaries:
This adds a little more complication, and you may see it defined in multiple forms. Here’s two version of the same thing:
1 2 3 4 5 6 7 | - user:
name: "{{ item.name }}"
state: present
groups: "{{ item.groups }}"
loop:
- { name: 'greg', groups: 'tacos' }
- { name: 'sowell', groups: 'robot' } |
1 2 3 4 5 6 7 8 9 10 11 | vars:
sys_users:
- name: greg
groups: tacos
- name: sowell
groups: robot
- user:
name: "{{ item.name }}"
state: present
groups: "{{ item.groups }}"
loop: "{{ sys_users }}" |
Looking at the above two options I actually think version two makes more sense(this is how you are most likely to encounter this information). Most often you won’t statically define this stuff, rather it will be returned from some other task.
Make note how the name and groups are referenced in the loop as “item.keyvalue”.
That’s one of the tricky bits about Ansible, there are a lot of ways to accomplish the same task 🙂
Nested Loops
This is a bit of a trick question 🙂 Loops can’t be nested, BUT what you can do is have a loop that calls a role or another task yaml file. Take for example the following task
1 2 3 4 5 6 7 8 9 10 11 12 13 | ---
- name: nested loop test
hosts: localhost
gather_facts: faluse
tasks:
- name: loop through items and include task file for further looping
include_tasks: tasks/2nd_loop.yml
loop:
- Greg
- Jimmy
loop_control:
loop_var: outter_names |
Contents of tasks/2nd_loop.yml
1 2 3 4 5 6 7 8 9 10 | ---
- name: the inner loop
debug:
msg: "{{ outter_names }} loves {{ inner_food }}"
loop:
- burgers
- pizza
- waffle fries
loop_control:
loop_var: inner_food |
You’ll notice some new stuff here; namely “loop_control”. This gives you multiple new abilities on loops, but here you see that I use “loop_var”. This allows me to rename how the loop is referenced in the resulting task(or called tasks). In the original playbook I name the outer loop variables outer_names and on the called task I rename them inner_food. The reason this is so important is that by default loop results are named “item”. If you are nesting loops, then both loops would attempt to use the same name of “item” and that would create a conflict. If I rename my loop variables, then everything keeps working correctly and is also much easier to read.
This will result in:
1 2 3 4 5 6 7 8 9 10 11 12 13 14 15 16 17 18 19 20 21 22 23 24 25 26 27 28 29 30 31 32 | [root@ansible1 ansible]# ansible-playbook outerloop.yml
PLAY [nested loop test] ***************************************************************************************************************************************************************
TASK [loop through items and include task file for further looping] *******************************************************************************************************************
included: /etc/ansible/tasks/2nd_loop.yml for localhost
included: /etc/ansible/tasks/2nd_loop.yml for localhost
TASK [the inner loop] *****************************************************************************************************************************************************************
ok: [localhost] => (item=burgers) => {
"msg": "Greg loves burgers"
}
ok: [localhost] => (item=pizza) => {
"msg": "Greg loves pizza"
}
ok: [localhost] => (item=waffle fries) => {
"msg": "Greg loves waffle fries"
}
TASK [the inner loop] *****************************************************************************************************************************************************************
ok: [localhost] => (item=burgers) => {
"msg": "Jimmy loves burgers"
}
ok: [localhost] => (item=pizza) => {
"msg": "Jimmy loves pizza"
}
ok: [localhost] => (item=waffle fries) => {
"msg": "Jimmy loves waffle fries"
}
PLAY RECAP ****************************************************************************************************************************************************************************
localhost : ok=4 changed=0 unreachable=0 failed=0 skipped=0 rescued=0 ignored=0 |
Code Block Loops
Here’s another gotcha; code blocks like this can’t be looped. The following fails:
1 2 3 4 5 6 7 8 | - name: why can't we loop this?
block:
- name: print stuff
debug:
msg: "{{ item }}"
loop:
- too bad
- so sad |
Lookups
Lookup plugins allow access to outside data sources. This can be pulling info from files on the local system to say pulling the time from your ansible control node. Keep in mind that they run on the control node only(not on the remote host). There are SO MANY lookup plugins. I suppose I’ll add my favorites from time to time here.
Lookup plugins are usually called something like this:
1 2 | vars:
file_contents: "{{lookup('file', 'path/to/file.txt')}}" |
In the above notice it is called within the mustaches “{{}}”. This tells ansible to break out into jinja2 for processing. Here the lookup plugin calls for a file, then supplies the file to pull it from.
Lookup plugins also have error handling in the form of the errors option:
1 2 | - name: file doesnt exist, but i dont care .. file plugin itself warns anyways ...
debug: msg="{{ lookup('file', '/idontexist', errors='ignore') }}" |
Options are ignore, warn, or strict(strict is the default and will cause the task to fail).
By default a lookup plugin returns a comma separated list of values, which if you want to use it in a loop isn’t great. You can add the option wantlist=True or you can substitute the lookup plugin for the query plugin if you want a list returned. The query plugin returns a list by default. Here are the options side by side:
1 2 3 4 5 | lookup('dict', dict_variable, wantlist=True)
query('dict', dict_variable)
q('dict', dict_variable) |
q = query in the above.
Filters
Stuff here soon.
1 |
Conditionals
Conditionals allow for checking “when” something is true. This way I can check for something like OS type or firmware version.
Searching for a string in a variable is as simple as adding this to a playbook:
1 | when: variable is search("my string") |
An example would be:
1 2 3 4 5 6 7 8 9 10 11 12 13 14 15 | ---
- name: testing conditionals
hosts: localhost
vars:
test_var: this contains my string
tasks:
- name: will match
when: test_var is search("my string")
debug:
msg: It did contain the string
- name: will NOT match
when: test_var is not search("my string")
debug:
msg: It did NOT contain the string |
In the above I created a variable named test_var.
In the following two tasks I have a conditional(a “when” parameter) that is searching for my string in a variable.
A when condition will match when whatever is being checked returns true. For example, here are some other valid conditionals:
1 2 3 4 5 6 | when: true when: false when: 1 == 1 when: 2 != 4 when: variable1 == variable2 when: variable1 >= 3 |
Once a when condition is true, it will process the task. If the condition returns false, it will “skip” processing of that task for the designated host.
Random Tips
Assert Module
The assert module gives you the ability to verify certain conditions at any point in your playbook. So half way through my playbook if all conditions aren’t ideal, I can have an assert task kill the playbook. Take the following playbook for example.
1 2 3 4 5 6 7 8 9 10 11 12 13 14 15 16 17 18 19 20 21 | ---
- name: testing assert
hosts: localhost
gather_facts: false
vars:
tasks:
- name: assert 1
assert:
that:
- 1 == 1
- name: assert 2
assert:
that:
- 1 == 2
- name: assert 3
assert:
that:
- 1 == 1 |
Notice that assert 1 passes(1 does equal 1). Assert two, however, will fail, and my playbook will stop:
1 2 3 4 5 6 7 8 9 10 11 12 13 14 15 16 17 18 19 20 21 22 | [root@localhost general]# ansible-playbook assert-test.yml
[WARNING]: provided hosts list is empty, only localhost is available. Note that
the implicit localhost does not match 'all'
PLAY [testing assert] **********************************************************
TASK [assert 1] ****************************************************************
ok: [localhost] => {
"changed": false,
"msg": "All assertions passed"
}
TASK [assert 2] ****************************************************************
fatal: [localhost]: FAILED! => {
"assertion": "1 == 2",
"changed": false,
"evaluated_to": false,
"msg": "Assertion failed"
}
PLAY RECAP *********************************************************************
localhost : ok=1 changed=0 unreachable=0 failed=1 skipped=0 rescued=0 ignored=0 |
Spanning Multiple Lines with Values
You can quickly test what it does with this website(don’t even have to do it within ansible).
The pipe keeps everything just as seen on multiple lines(it puts line breaks after each line).
1 2 3 4 5 6 7 | multiple_lines: | this line will read just how you see it here. Where these will all be multiple lines. |

The greater than will concatenate everything into a single line
1 2 3 4 5 6 7 | single_line: > all of this shows up as a single line. This allows you to just break up long lines. |

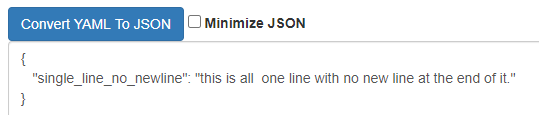
Both of the above | and > have “\n” new lines at the end of them. You can add the – to the end of them to remove new lines as in >- or |-.
1 2 3 4 5 | single_line_no_newline: >- this is all one line with no new line at the end of it. |
1 |
1 |
Ansible has a lot of good Zabbix control modules found here:.
zabbix_action – Create/Delete/Update Zabbix actions
zabbix_group – Create/delete Zabbix host groups
zabbix_group_info – Gather information about Zabbix hostgroup
zabbix_host – Create/update/delete Zabbix hosts
zabbix_host_info – Gather information about Zabbix host
zabbix_hostmacro – Create/update/delete Zabbix host macros
zabbix_maintenance – Create Zabbix maintenance windows
zabbix_map – Create/update/delete Zabbix maps
zabbix_mediatype – Create/Update/Delete Zabbix media types
zabbix_proxy – Create/delete/get/update Zabbix proxies
zabbix_screen – Create/update/delete Zabbix screens
zabbix_template – Create/update/delete/dump Zabbix template
I decided that in my Cisco IOS upgrade workflow I wanted the devices being updated to be in maintenance mode to cut down on notification spam. The playbook I used is linked here, so the version you see below may be old.
1 2 3 4 5 6 7 8 9 10 11 12 13 14 15 16 17 18 19 20 21 22 23 24 25 | ---
- name: Put Zabbix groups into maint
hosts: all
gather_facts: false
vars:
maint_desc: IOS upgrades
maint_group: cat_update_lab
maint_mins: 90
zab_host: 192.168.51.5
# gen1_user/pass are custom credentials I use in tower
# gen1_user: username
# gen1_pword: password
tasks:
- name: put the devices undergoing work into maint
run_once: True
zabbix_maintenance:
name: "{{ maint_desc }}"
host_groups:
- "{{ maint_group }}"
state: present
minutes: "{{ maint_mins }}"
server_url: "http://{{ zab_host }}/zabbix"
login_user: "{{ gen1_user }}"
login_password: "{{ gen1_pword }}" |
I’ve gotten where I variablize as much of the work as I can so that I can just pass parameters in via Tower.
In this case I created a custom credential for username and password, so that is passed in at run time.
zab_host is the IP or DNS name of the user.
Also notice the server_url; the default install path is /zabbix, so if you changed that adjust it here.
I’m using host_groups, which means I’m disabling a group of devices at a time. You could also just do the individual hosts or hosts and groups if you want.
Something important to note is that the zabbix API must be installed on the zabbix server:
1 | pip3 install zabbix-api |
Here’s a shot of my workflow.
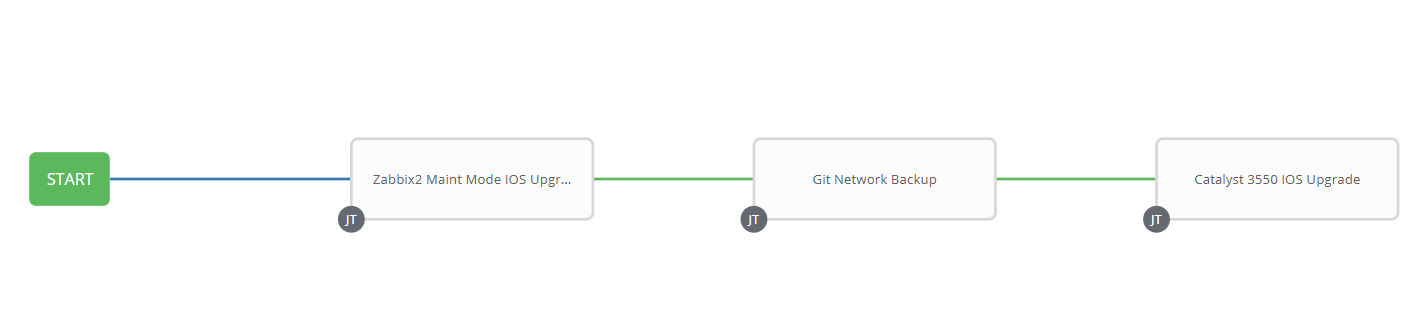
First I put the kit into maintenance mode.
Second I perform a backup of the devices to be upgraded.
Last I check if the devices are at the correct version and if not, perform the upgrade.
With so many options, I’m sure I’ll keep building; let me know what you envision having Ansible do?